My Ubuntu Jaunty Jackalope upgrade plan

Well, not much of a “plan”, but bear with me.

Ever since using [[Debian]] and [[Ubuntu]], I have installed the OS just once per computer. All software upgrades, including full releases, have been done through upgrades, not re-installations. This means that I have never actually had the need to download any ISO besides the first one used when I bought the computer.

This is fine, but I always felt the compulsion to share my bandwidth with fellow Linux users, and relieve some load from the [[Canonical Ltd.]] servers. So for every new Ubuntu release, I have downloaded one or more (amd64, i386, desktop, alternate…) Ubuntu CD ISOs via BitTorrent, and kept them uploading for some time. However, the full BT download of the ISO is a waste of bandwidth, and unless my later upload share is greater than 1.0, I will have been overloading the servers, not relieving them.

Now, with Jaunty Jackalope, I have a way to fix this. I could have done similarly with previous releases, but I didn’t. Here’s the deal: download the ISO and share it with BitTorrent, but don’t upgrade from the Internet as well. Upgrade from the ISO I just downloaded! In the past I would be reluctant to do this, among other things because I don’t want to waste a physical CD for that. However, the Ubuntu upgrade instructions say how to mount the ISO (yes, mounting ISOs is not new. I’ve done it in the past), then upgrade from the mounted image. Once the upgrade is done, I can keep seeding the ISO with BitTorrent.

With this procedure I can use bandwidth more efficiently (I download the required software just once), and I can still share the ISO with other people. Moreover, there is another plus: the ISO is just 699 MB, whereas the upgrade manager in Ubuntu tells me that for the upgrade I will need to download more than 1 GB! The difference is due to the ISO being somehow compressed, I think. I will report on the size of the file system mounted from the ISO (which should be much more than 1 GB).

Update: Well, actually the internet upgrade involves more packages. If you upgrade from the CD, you are still required to download 800 more MB to complete the upgrade, so no magic there.

Comments

Save HD space by using compressed files directly

Maybe the constant increases in hard disk capacity provide us with more space we can waste with our files, but there is always a situation in which we would like to squeeze as much data in as little space as possible. Besides, it is always a good practice to keep disk usage as low as possible, just for tidiness.

The first and most important advice for saving space: for $GOD’s sake, delete the stuff you don’t need!

Now, assuming you want to keep all you presently have, the second tool is [[data compression]]. Linux users have long time friends in the [[gzip]] and [[bzip2]] commands. One would use the former for fast (and reasonably good) compression, and the latter for when saving space is really vital (although bzip2 is really slow). A more recent entry in the “perfect compression tool” contest would be [[Lempel-Ziv-Markov chain algorithm]] (LZMA). This one can compress even more than bzip2, being usually faster (although never as fast as gzip).

One problem with compression is that it is a good way of storing files, but they usually have to be uncompressed to modify, and then re-compressed, and this is very slow. However, we have some tools to interact with the compressed files directly (internally decompressing “on the fly” only the part that we need to edit). I would like to just mention them here:

Shell commands

We can use zcat, zgrep and zdiff as replacements for cat, grep and diff, but for gzipped files. These account for a huge fraction of all the interaction I do with text files from the command line. If you are like me, they can save you tons of time.

Vim

[[Vim (text editor)|Vim]] can be instructed to open some files making use of some decompression tool, to show the contents of the file and work on them transparently. Once we :wq out of the file, we will get the original compressed file. The speed to do this cycle is incredibly fast: almost as fast as opening the uncompressed file, and nowhere near as slow as gunzipping, viming and gzipping sequentially.

You can add the following to your .vimrc config file for the above:

" Only do this part when compiled with support for autocommands.
if has("autocmd")

 augroup gzip
  " Remove all gzip autocommands
  au!

  " Enable editing of gzipped files
  " set binary mode before reading the file
  autocmd BufReadPre,FileReadPre	*.gz,*.bz2,*.lz set bin

  autocmd BufReadPost,FileReadPost	*.gz call GZIP_read("gunzip")
  autocmd BufReadPost,FileReadPost	*.bz2 call GZIP_read("bunzip2")
  autocmd BufReadPost,FileReadPost	*.lz call GZIP_read("unlzma -S .lz")

  autocmd BufWritePost,FileWritePost	*.gz call GZIP_write("gzip")
  autocmd BufWritePost,FileWritePost	*.bz2 call GZIP_write("bzip2")
  autocmd BufWritePost,FileWritePost	*.lz call GZIP_write("lzma -S .lz")

  autocmd FileAppendPre			*.gz call GZIP_appre("gunzip")
  autocmd FileAppendPre			*.bz2 call GZIP_appre("bunzip2")
  autocmd FileAppendPre			*.lz call GZIP_appre("unlzma -S .lz")

  autocmd FileAppendPost		*.gz call GZIP_write("gzip")
  autocmd FileAppendPost		*.bz2 call GZIP_write("bzip2")
  autocmd FileAppendPost		*.lz call GZIP_write("lzma -S .lz")

  " After reading compressed file: Uncompress text in buffer with "cmd"
  fun! GZIP_read(cmd)
    let ch_save = &ch
    set ch=2
    execute "'[,']!" . a:cmd
    set nobin
    let &ch = ch_save
    execute ":doautocmd BufReadPost " . expand("%:r")
  endfun

  " After writing compressed file: Compress written file with "cmd"
  fun! GZIP_write(cmd)
    if rename(expand(""), expand(":r")) == 0
      execute "!" . a:cmd . " :r"
    endif
  endfun

  " Before appending to compressed file: Uncompress file with "cmd"
  fun! GZIP_appre(cmd)
    execute "!" . a:cmd . " "
    call rename(expand(":r"), expand(""))
  endfun

 augroup END
endif " has("autocmd")

I first found the above in my (default) .vimrc file, allowing gzipped and bzipped files to be edited. I added the “support” for LZMAed files quite trivially, as can be seen in the lines containign “lz” in the code above (I use .lz as termination for LZMAed files, instead of the default .lzma. See man lzma for more info).

Non-plaintext files

Other files that I have been able to successfully use in compressed form are [[PostScript]] and [[Portable Document Format|PDF]]. Granted, PDFs are already quite compact, but sometimes gzipping them saves space. In general, PS and EPS files save a lot of space by gzipping.

As far as I have tried, the [[Evince]] document viewer can read gzipped PS, EPS and PDF files with no problem (probably [[Device_independent_file_format|DVI]] files as well).

Comments (3)

MediaWiki: URL beautification HowTo

The default [[MediaWiki]] installation will leave you with [[URL]]s of the type:

http://mywiki.site.tld/wiki/wiki/index.php?title=Article_name

This is ugly! Following instructions at the MediaWiki.org site, you can make it simpler and nicer:

http://mywiki.site.tld/wiki/Article_name

To achieve that, add the following to /etc/apache2/httpd.conf:

AcceptPathInfo On
Alias /wiki /usr/share/mediawiki/index.php

Then add/modify the following at /var/lib/mediawiki/LocalSettings.php (again, Debian default path):

$wgScriptPath = '/w'; # Path to the actual files. This should already be there
$wgArticlePath = '/wiki/$1'; # This directory MUST be different from $wgScriptPath
$wgUsePathInfo = true;

Recall that you must have two “directories”, which in the example above are /w and /wiki. The former is “real” and the latter is “virtual”.

The real dir (the one used as value for $wgScriptPath) must contain the MediaWiki files, thus it must point to the /usr/share/mediawiki dir. To this end, it must either exist in the [[Apache HTTP Server|Apache]] root (usually /var/www/), or be an alias. If you follow the first route, you can make a link, like in the following example:

% ln -s /usr/share/mediawiki /var/www/w

The second route would imply adding this line to /etc/apache2/httpd.conf:

Alias /w /usr/share/mediawiki

The latter requires restarting the Apache daemon, but I personally prefer it.

The virtual dir (the one used as value for $wgArticlePath) will be our path to get rid of the URL ugliness, and point directly to an article’s title. As such, it must be aliased in /etc/apache2/httpd.conf adding the following line to it, as mentioned above:

Alias /wiki /usr/share/mediawiki/index.php

Finally, you shold enable the rewrite PHP module, if it’s not enable already, and reload Apache:

% cd /etc/apache2/mods-enable/
% ln -s ../mods-available/rewrite.load .
% /etc/init.d/apache2 reload

After that, pointing to website/wiki/somearticle should lead you to the wiki page for somearticle. For more information, refer to the MediaWiki.org site.

Comments (2)

Usable Compiz Fusion: zoom to window

It is common to hear that recent advances in the Linux desktop, such as [[Compiz Fusion]], are more of a fancy but useless aesthetic contribution to the desktop. While it may be true for many of the CF features, it is no less true that you never know when a given effect will turn out to be useful.

In this post I want to praise the Enhanced Zoom Desktop plugin. It turned out to be of great use for me in the following situation. I wanted to run [[Diablo II]] in my laptop (yes, it runs in Linux, under Wine). The native resolution of the program (640×480 or 800×600) is lower than that of my screen (1280×800), so I have two options: to execute it in windowed mode, or fullscreen. In windowed mode the window occupies less than 2/3 of the 13.3″ screen, wasting space and making it unnecessarily small. Fullscreen mode seems to be better, but it isn’t. Since the width/height ratio is smaller for Diablo than for the screen, the former will be stretched horizontally, distorting the images (everything looks more squat). Fullscreen mode also gave me other problems, like crashing more easily when alt-tabbing.

Here is where the zooming of Compiz Fusion comes in handy. Apart from an arbitrary zoom (using the mouse wheel while pressing the Super key, a.k.a. windows key), there is a handy shortcut (Super+r) that zooms up to the point of the screen under the cursor occupying the whole screen. When zooming, the movement of the mouse makes the zooming “window” to move around, showing different parts of the desktop. To avoid it (clearly unwanted if we want to stay inside the Diablo window), we have another shortcut: Super+l. This shortcut toggles on and off the “zooming lens follows the mouse” movement.

So now, if I want to play Diablo I open it in windowed mode, then put the cursor inside the window, then hit Super+r, then Super+l, and I have a Diablo window as big as possible to fit in my screen, preserving height/width ratio, and keeping the mouse inside the window.

Comments

Some more tweaks to my Python script

Update: you can find the outcome of all this in a latter post: Project BHS

All the comments to my previous post have provided me with hints to increase further the efficiency of a script I am working on. Here I present the advices I have followed, and the speed gain they provided me. I will speak of “speedup”, instead of timing, because this second set of tests has been made in a different computer. The “base” speed will be the last value of my previous test set (1.5 sec in that computer, 1.66 in this one). A speedup of “2” will thus mean half an execution time (0.83 s in this computer).

Version 6: Andrew Dalke suggested the substitution of:

line = re.sub('>','<',line)

with:

line = line.replace('>','<')

Avoiding the re module seems to speed up things, if we are searching for fixed strings, so the additional features of the re module are not needed.

This is true, and I got a speedup of 1.37.

Version 7: Andrew Dalke also suggested substituting:

search_cre = re.compile(r'total_credit').search
if search_cre(line):

with:

if 'total_credit' in line:

This is more readable, more concise, and apparently faster. Doing it increases the speedup to 1.50.

Version 8: Andrew Dalke also proposed flattening some variables, and specifically avoiding dictionary search inside loops. I went further than his advice, even, and substituted:

stat['win'] = [0,0]

loop
  stat['win'][0] = something
  stat['win'][1] = somethingelse

with:

win_stat_0 = 0
win_stat_1 = 0

loop
  win_stat_0 = something
  win_stat_1 = somethingelse

This pushed the speedup futher up, to 1.54.

Version 9: Justin proposed reducing the number of times some patterns were matched, and extract some info more directly. I attained that by substituting:

loop:
  if 'total_credit' in line:
    line   = line.replace('>','<')
    aline  = line.split('<')
    credit = float(aline[2])

with:

pattern    = r'total_credit>([^<]+)<';
search_cre = re.compile(pattern).search

loop:
  if 'total_credit' in line:
    cre    = search_cre(line)
    credit = float(cre.group(1))

This trick saved enough to increase the speedup to 1.62.

Version 10: The next tweak was an idea of mine. I was diggesting a huge log file with zcat and grep, to produce a smaller intermediate file, which Python would process. The structure of this intermediate file is of alternating lines with “total_credit” then “os_name” then “total_credit”, and so on. When processing this file with Python, I was searching the line for “total_credit” to differentiate between these two lines, like this:

for line in f:
  if 'total_credit' in line:
    do something
  else:
    do somethingelse

But the alternating structure of my input would allow me to do:

odd = True
for line in f:
  if odd:
    do something
    odd = False
  else:
    do somethingelse
    odd = True

Presumably, checking falsity of a boolean is faster than matching a pattern, although in this case the gain was not huge: the speedup went up to 1.63.

Version 11: Another clever suggestion by Andrew Dalke was to avoid using the intermediate file, and use os.popen to connect to and read from the zcat/grep command directly. Thus, I substituted:

os.system('zcat host.gz | grep -F -e total_credit -e os_name > '+tmp)

f = open(tmp)
for line in f:
  do something

with:

f = os.popen('zcat host.gz | grep -F -e total_credit -e os_name')

for line in f:
  do something

This saves disk I/O time, and the performance is increased accordingly. The speedup goes up to 1.98.

All the values I have given are for a sample log (from MalariaControl.net) with 7 MB of gzipped info (49 MB uncompressed). I also tested my scripts with a 267 MB gzipped (1.8 GB uncompressed) log (from SETI@home), and a plot of speedups vs. versions follows:

versions2.png

Execution speedup vs. version
(click to enlarge)

Notice how the last modification (avoiding the temporary file) is of much more importance for the bigger file than for the smaller one. Recall also that the odd/even modification (version 10) is of very little importance for the small file, but quite efficient for the big file (compare it with Version 9).

The plot doesn’t tell (it compares versions with the same input, not one input with the other), but my eleventh version of the script runs the 267 MB log faster than the 7 MB one with Version 1! For the 7 MB input, the overall speedup from Version 1 to Version 11 is above 50.

Comments (11)

Summary of my Python optimization adventures

This is a follow up to two previous posts. In the first one I spoke about saving memory by reading line-by-line, instead of all-at-once, and in the second one I recommended using Unix commands.

The script reads a host.gz log file from a given BOINC project (more precisely one I got from MalariaControl.net, because it is a small project, so its logs are also smaller), and extracts how many computers are running the project, and how much credit they are getting. The statistics are separated by operating system (Windows, Linux, MacOS and other).

Version 0

Here I read the whole file to RAM, then process it with Python alone. Running time: 34.1s.

#!/usr/bin/python

import os
import re
import gzip

credit  = 0
os_list = ['win','lin','dar','oth']

stat = {}
for osy in os_list:
  stat[osy] = [0,0]

# Process file:
f = gzip.open('host.gz','r')
for line in f.readlines():
  if re.search('total_credit',line):
    credit = float(re.sub('/?total_credit>',' ',line.split()[0])
  elif re.search('os_name',line):
    if re.search('Windows',line):
      stat['win'][0] += 1
      stat['win'][1] += credit
    elif re.search('Linux',line):
        stat['lin'][0] += 1
        stat['lin'][1] += credit
    elif re.search('Darwin',line):
      stat['dar'][0] += 1
      stat['dar'][1] += credit
    else:
      stat['oth'][0] += 1
      stat['oth'][1] += credit
f.close()

# Return output:
nstring = ''
cstring = ''
for osy in os_list:
  nstring +=   "%15.0f " % (stat[osy][0])
  try:
    cstring += "%15.0f " % (stat[osy][1])
  except:
    print osy,stat[osy]

print nstring
print cstring

Version 1

The only difference is a “for line in f:“, instead of “for line in f.readlines():“. This saves a LOT of memory, but is slower. Running time: 44.3s.

Version 2

In this version, I use precompiled regular expresions, and the time-saving is noticeable. Running time: 26.2s

#!/usr/bin/python

import os
import re
import gzip

credit  = 0
os_list = ['win','lin','dar','oth']

stat = {}
for osy in os_list:
  stat[osy] = [0,0]


pattern    = r'total_credit'
match_cre  = re.compile(pattern).match
pattern    = r'os_name';
match_os   = re.compile(pattern).match
pattern    = r'Windows';
search_win = re.compile(pattern).search
pattern    = r'Linux';
search_lin = re.compile(pattern).search
pattern    = r'Darwin';
search_dar = re.compile(pattern).search

# Process file:
f = gzip.open('host.gz','r')

for line in f:
  if match_cre(line,5):
    credit = float(re.sub('/?total_credit>',' ',line.split()[0])
  elif match_os(line,5):
    if search_win(line):
      stat['win'][0] += 1
      stat['win'][1] += credit
    elif search_lin(line):
      stat['lin'][0] += 1
      stat['lin'][1] += credit
    elif search_dar(line):
      stat['dar'][0] += 1
      stat['dar'][1] += credit
    else:
      stat['oth'][0] += 1
      stat['oth'][1] += credit
f.close()

# etc.

Version 3

Later I decided to use AWK to perform the heaviest part: parsing the big file, to produce a second, smaller, file that Python will read. Running time: 14.8s.

#!/usr/bin/python

import os
import re

credit  = 0
os_list = ['win','lin','dar','oth']

stat = {}
for osy in os_list:
  stat[osy] = [0,0]

pattern    = r'Windows';
search_win = re.compile(pattern).search
pattern    = r'Linux';
search_lin = re.compile(pattern).search
pattern    = r'Darwin';
search_dar = re.compile(pattern).search

# Distile file with AWK:
tmp = 'bhs.tmp'
os.system('zcat host.gz | awk \'/total_credit/{printf $0}/os_name/{print}\' > '+tmp)

stat = {}
for osy in os_list:
  stat[osy] = [0,0]
# Process tmp file:
f = open(tmp)
for line in f:
  line = re.sub('>','<',line)
  aline = line.split('<')
  credit = float(aline[2])
  os_str = aline[6]
  if search_win(os_str):
    stat['win'][0] += 1
    stat['win'][1] += credit
  elif search_lin(os_str):
    stat['lin'][0] += 1
    stat['lin'][1] += credit
  elif search_dar(os_str):
    stat['dar'][0] += 1
    stat['dar'][1] += credit
  else:
    stat['oth'][0] += 1
    stat['oth'][1] += credit
f.close()

# etc

Version 4

Instead of using AWK, I decided to use grep, with the idea that nothing can beat this tool, when it comes to pattern matching. I was not disappointed. Running time: 5.4s.

#!/usr/bin/python

import os
import re

credit  = 0
os_list = ['win','lin','dar','oth']

stat = {}
for osy in os_list:
  stat[osy] = [0,0]

pattern    = r'total_credit'
search_cre = re.compile(pattern).search

pattern    = r'Windows';
search_win = re.compile(pattern).search
pattern    = r'Linux';
search_lin = re.compile(pattern).search
pattern    = r'Darwin';
search_dar = re.compile(pattern).search

# Distile file with grep:
tmp = 'bhs.tmp'
os.system('zcat host.gz | grep -e total_credit -e os_name > '+tmp)

# Process tmp file:
f = open(tmp)
for line in f:
  if search_cre(line):
    line = re.sub('>','<',line)
    aline = line.split('<')
    credit = float(aline[2])
  else:
    if search_win(line):
      stat['win'][0] += 1
      stat['win'][1] += credit
    elif search_lin(line):
      stat['lin'][0] += 1
      stat['lin'][1] += credit
    elif search_dar(line):
      stat['dar'][0] += 1
      stat['dar'][1] += credit
    else:
      stat['oth'][0] += 1
      stat['oth'][1] += credit

f.close()

# etc

Version 5

I was not completely happy yet. I discovered the -F flag for grep (in the man page), and decided to use it. This flag tells grep that the pattern we are using is a literal, so no expansion of it has to be made. Using the -F flag I further reduced the running time to: 1.5s.

time_vs_version.png

Running time vs. script version (Click to enlarge)

Comments (14)

Python: speed vs. memory tradeoff reading files

I was making a script to process some log file, and I basically wanted to go line by line, and act upon each line if some condition was met. For the task of reading files, I generally use readlines(), so my first try was:

f = open(filename,'r')
for line in f.readlines():
  if condition:
    do something
f.close()

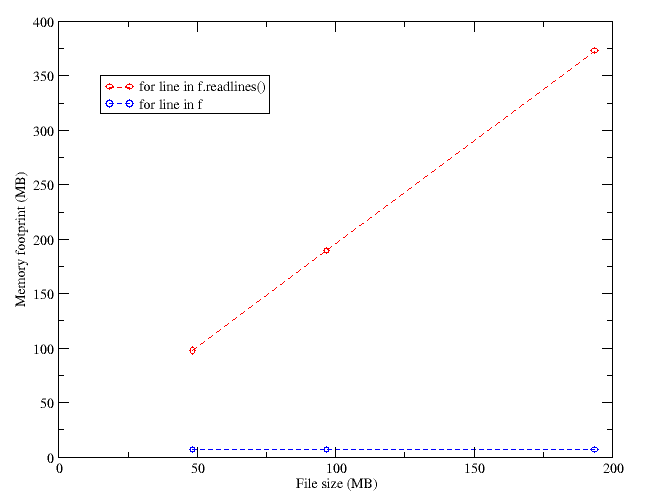
However, I realized that as the size of the file read increased, the memory footprint of my script increased too, to the point of almost halting my computer when the size of the file was comparable to the available RAM (1GB).

Of course, Python hackers will frown at me, and say that I was doing something stupid… Probably so. I decided to try a different thing to reduce the memory usage, and did the following:

f = open(filename,'r')
for line in f:
  if condition:
    do something
f.close()

Both pieces of code look very similar, but pay a bit of attention and you’ll see the difference.

The problem with “f.readlines()” is that it reads the whole file and assigns lines to the elements of an (anonymous, in this case) array. Then, the for loops through the array, which is in memory. This leads to faster execution, because the file is read once and then forgotten, but requires more memory, because an array of the size of the file has to be created in the RAM.

fileread_memory

Fig. 1: Memory vs file size for both methods of reading the file

When you do “for line in f:“, you are effectively reading the lines one by one when you do each cycle of the loop. Hence, the memory use is effectively constant, and very low, albeit the disk is accessed more often, and this usually leads to slower execution of the code.

fileread_time.png

Fig. 2: Execution time vs file size for both methods of reading the file

Comments (2)

« Previous Page « Previous Page Next entries »