Microsoft produces crap, AMD eats it

It’s old news, but I just read about in in the Wikipedia article for the [[Phenom II]] processor.

Apparently Phenom processors had the ability to scale the CPU frequency independently for each core in multicore systems. Now, Phenom II processors lack this feature: the CPU frequency can be scaled, but all cores must share the same frequency.

Did this happen because of technical reasons? AMD thought it was better to do it? No. As Wikipedia says:

Another change from the original Phenom is that Cool ‘n Quiet is now applied to the processor as a whole, rather than on a per-core basis. This was done in order to address the mishandling of threads by Windows Vista, which can cause single-threaded applications to run on a core that is idling at half-speed.

The situation is explained in an article in anandtech.com, where the author mistakes an error on Vista’s account with an error in the Phenom processor (bolding of text is mine):

In theory, the AMD design made sense. If you were running a single threaded application, the core that your thread was active on would run at full speed, while the remaining three cores would run at a much lower speed. AMD included this functionality under the Cool ‘n’ Quiet umbrella. In practice however, Phenom’s Cool ‘n’ Quiet was quite flawed. Vista has a nasty habit of bouncing threads around from one core to the next, which could result in the following phenomenon (no pun intended): when running a single-threaded application, the thread would run on a single core which would tell Vista that it needed to run at full speed. Vista would then move the thread to the next core, which was running at half-speed; now the thread is running on a core that’s half the speed as the original core it started out on.

Phenom II fixes this by not allowing individual cores to run at clock speeds independently of one another; if one core must run at 3.0GHz, then all four cores will run at 3.0GHz. In practice this is a much better option as you don’t run into the situations where Phenom performance is about half what it should be thanks to your applications running on cores that are operating at half speed. In the past you couldn’t leave CnQ enabled on a Phenom system and watch an HD movie, but this is no longer true with Phenom II.

Recall how the brilliant author ascribes the “flaw” to CnQ, instead of to Vista, and how it was AMD who “fixed” the problem!

The plain truth is that AMD developed a technology (independent core scaling) that would save energy (which means money and ecology) with zero-effects on performance (since the cores actually running jobs run at full speed), and MS Vista being a pile of crap forced them to revert it.

Now, if you have a computer with 4 or 8 cores, and watch a HD movie (which needs a full-speed core to decode it, but only one core), the full 8 cores will be running at full speed, wasting power, producing CO2, and making you get charged money at a rate 8 times that actually required!

The obvious right solution would be to fix Vista so that threads don’t dance from core to core unnecessarily, so that AMD’s CnQ technology could be used to full extent. AMD’s movement with Phenom II just fixed the performance problem, by basically destroying the whole point of CnQ.

Now take a second to reflex how the monstrous domination of MS over the OS market leads to problems like this one. In a really competitive market, if a stupid OS provider gets it wrong and their OS does not support something like CnQ properly, the customers will migrate to other OSs, and the rogue provider will be forced to fix their OS. The dominance of MS (plus their stupidity), just held back precious technological advances!

Comments (2)

Changing font style in PyGTK ComboBox

I am using the [[Glade Interface Designer]] to produce (very) small (and simple) graphical apps for my [[Neo FreeRunner]]. I produce the graphical layout in the form of an [[XML]] file (using Glade), then load this XML from a [[PyGTK]] program.

The thing is some defaults are not really usable for a device such as the NFR. For example, default fonts are in general too small for the tiny screen of the Neo, which favors apps with only a few, big and shinny buttons. In the case of Label widgets, you can use Pango markup format with the set_markup method, as follows:

mylabel  = self.glade.get_widget('label1')
txt  = '<span font_size="80000" color="red">%s</span>' % (text_string)
mylabel.set_markup(txt)

However, for other widgets it is not so evident. For example, in ComboBoxes (buttons with a drop-down list), you can’t put in the item list anything other than strings, which are displayed literally (markup is not interpreted). Moreover, CBs do not have a “set_font_style” method, or anything similar.

Searching the web did not provide immediate results, but I managed to find this FAQ item at eccentric.cx. I quote:

4.1.581 How do I change font properties on gtk.Labels and other widgets?
Easy:

 label = gtk.Label("MyLabel")
 label.modify_font(pango.FontDescription("sans 48"))

This method applies to all widgets that use text, so you can change the text of gtk.Entry and other widgets in the same manner.

Note that, some widgets are only containers for others, like gtk.Button. For those you’d have to get the child widget. For a gtk.Button do this:

  if button.get_use_stock():
     label = button.child.get_children()[1]
  elif isinstance(button.child, gtk.Label):
     label = button.child
  else:
     raise ValueError("button does not have a label")

Last changed on Thu Sep 1 14:46:30 2005 by Johan Dahlin (johan-at-gnome-org)

In the case of a CB, we have to pick its child (which is the list itself), and modify it thusly:

cbox = self.glade.get_widget("CBlist")
cblist  = cbox.child
cblist.modify_font(pango.FontDescription("sans 32"))

In my examples above, a class has been created in the script beforehand, and it binds to the Glade XML:

class whatever:

  def __init__(self):

    #Set the Glade file
    self.glade    = gtk.glade.XML(gladefile)
    self.glade.signal_autoconnect(self)

Of course, the CBlist and MyLabel mentioned in my code are the appropriate widget names defined in that XML.

Comments

LWD – June 2009

This is a continuation post for my Linux World Domination project, started in this May 2008 post. You can read the previous post in the series here.

In the following data T2D means “time to domination” (the expected time for Windows/Linux shares to cross, counting from the present date). DT2D means difference (increase/decrease) in T2D, with respect to last report. CLP means “current Linux Percent”, as given by last logged data, and DD means domination day (in YYYY-MM-DD format).

For the first time, data for [[PrimeGrid]] is included.

Project T2D DT2D DD CLP Confidence %
Einstein 4.5 months +3.5 months 2009-10-14 44.51 (+2.42) 6.4
MalariaControl >10 years 12.64 (+0.09)
POEM >10 years 10.66 (+0.19)
PrimeGrid 75 months 2015-07-22 9.61 1.3
Rosetta >10 years 8.37 (+0.28)
QMC >10 years 7.92 (+0.05)
SETI >10 years 8.00 (+0.06)
Spinhenge >10 years 3.87 (+0.28)

Mmm, the numbers seem quite discouraging, but the data is what it is. On the bright side, all CLPs have gone up, some almost a 0.3% in 3 months. The Linux tide seems unstoppable, however its forward speed is not necessarily high.

As promised, today I’m showing the plots for PrimeGrid, in next issue QMC@home.

Number of hosts percent evolution for PrimeGrid (click to enlarge)

Accumulated credit percent evolution for PrimeGrid (click to enlarge)

Comments

Membership test: array versus dictionary

I guess this post is not going to reveal anything new: testing for an item’s membership in an array is slow, and dictionaries are much more CPU-efficient for that (albeit more RAM-hungry). I’m just restating the obvious here, plus showing some benchmarks.

Intro

Let’s define our problem first. We simply want to check whether some item (a string, number or whatever) is contained within some collection of items. For that, the simplest construct in [[Python (programming language)|Python]] would be:

if item in collection:
  do something

The above construct works regardless of “collection” being an array or a dictionary. However, the search for “item” in “collection” is different internally. In the case of a list, Python checks all its elements one by one, comparing them to “item”. If a match is found, True is returned, and the search aborted. For items not in the list, or appearing very late inside it, this search will take long.

However, in the case of dictionaries, the search is almost a one-step procedure: if collection[item] returns something other than an error, then item is in collection.

The tests

I’ve run two different test scripts, one for the array case, another for the dictionary case. In both cases I’ve searched for an item that was not in the collection, to maximize the searching efforts. The array script was as follows:

#!/usr/bin/python

import sys

nitems = int(sys.argv[1])

foo = []
bar = []

for i in range(nitems):
 foo.append(1)
 bar.append(2)

for i in foo:
  if i in bar:
    pass

Similarly, for dictionaries:

#!/usr/bin/python

import sys

nitems = int(sys.argv[1])

foo = {}
bar = {}

for i in range(nitems):
  j = i + nitems
  foo[i] = True
  bar[j] = True

for i in foo:
  if i in bar:
    pass

Both scripts accept (require) an integer number as argument, then build item collections of this size (initialization), then run the check loops. The loops are designed to look for every item of collection 1 in collection 2 (and all checks will fail, because no single item belongs to both sets).

Timing

The scripts were timed simply by measuring the execution [[wall clock time|walltime]] with the GNU time command, as follows:

% /usr/bin/time -f %e script nitems

Bear in mind that the computer was not otherwise idle during the tests. I was surfing the web with Firefox and listening to music with Amarok. Both programs are CPU- and (specially) memory-hungry, so take my results with a grain of salt. In any case, it was not my intention to get solid numbers, but just solid trends.

Memory profiling

I must confess my lack of knowledge around memory management of software, and how to profile it. I just used the [[Valgrind]] utility, with the massif tool, as follows:

% valgrind --tool=massif script nitems

Massif creates a log file (massif.out.pid) that contains “snapshots” of the process at different moments, and gives each of them a timestamp (the default timestamp being the number of instructions executed so far). The logged info that interests us is the [[dynamic memory allocation|heap]] size of the process. As far as I know (in my limited knowledge), this value corresponds to the RAM memory allotted to the process. This value can be digested out of the log file into a format suitable for printing heap size vs. execution time (instructions, really), by a Python script:

#!/usr/bin/python

import sys

try:
  fn = sys.argv[1]
except:
  sys.exit('Insert file name')

b2m = 1024*1024
e2m = 1000000

f = open(fn,'r')

for line in f:
  if 'time=' in line:
    aline = line.split('=')
    t     = aline[1].replace('\n','')
    t     = float(t)/e2m

  elif 'mem_heap_B' in line:
    aline = line.split('=')
    m     = aline[1].replace('\n','')
    m     = float(m)/b2m

    print t,m

f.close()

The above outputs heap MB vs million executions.

A much conciser form with [[AWK|awk]]:

% awk -F= '/time=/{t=$2/1000000};/mem_heap_B/{print t, $2/1048576}' massif.out.pid

Results

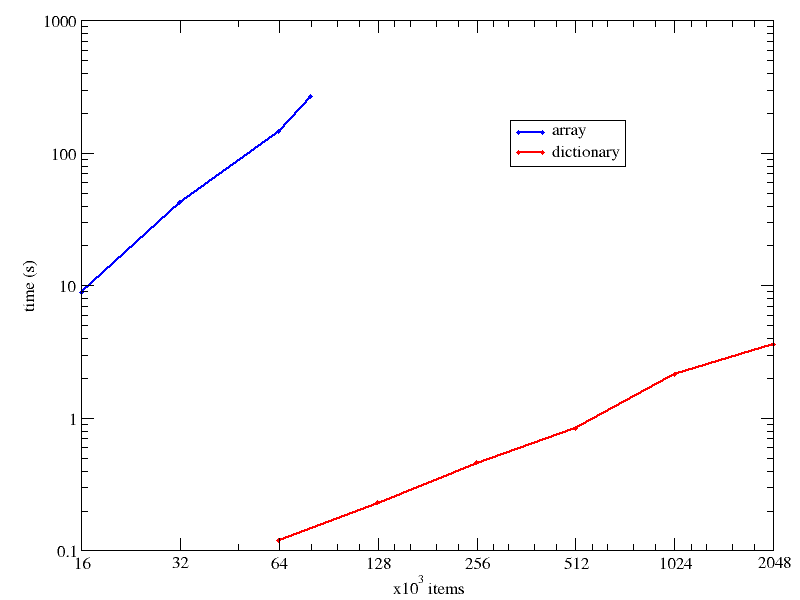
The execution times were so different, and the collection size (nitems) range so wide, I have used a [[logarithmic scale]] for both axes in the time vs collection size below:

times

At 64k items, the dictionary search is already 3 orders of magnitude faster, and the difference grows fast as the collection size increases.

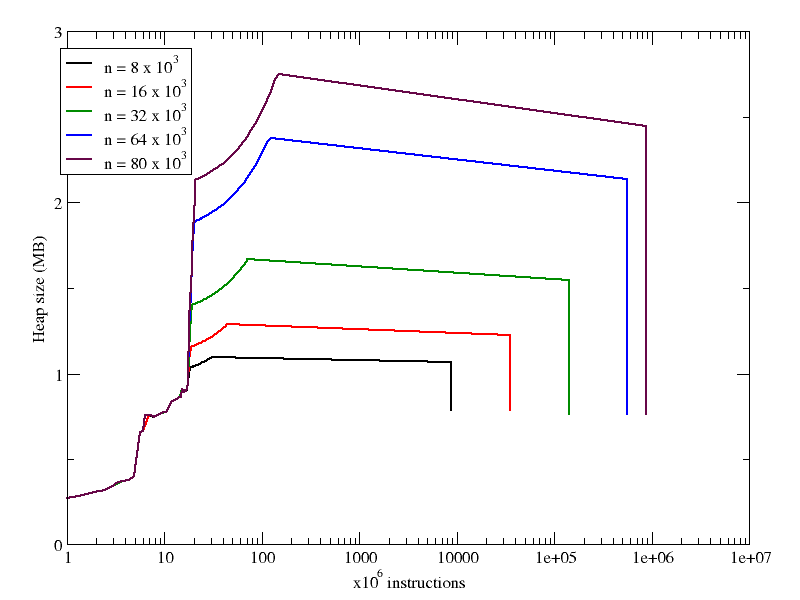
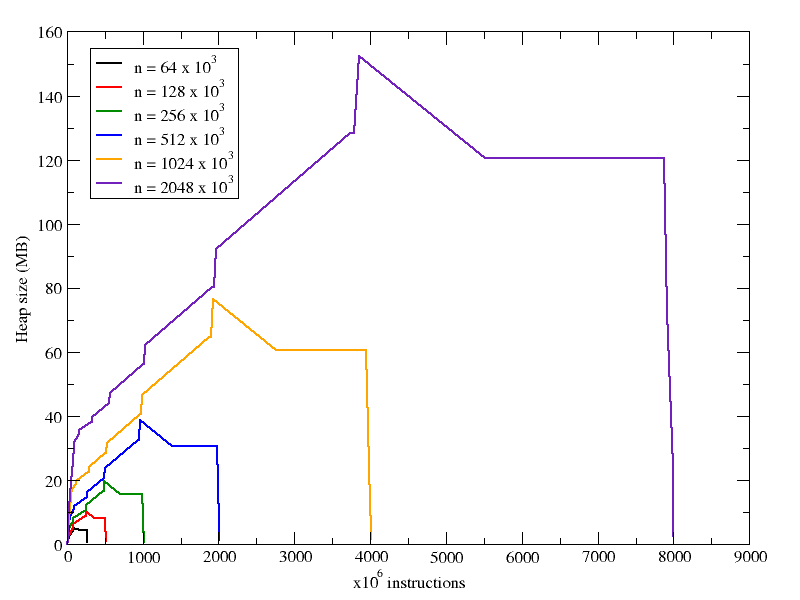
With respect to memory use, we can see that in both cases increasing nitems increases the heap size, but in the case of the arrays, the increase is not so pronounced. Looking at the X axes in both following plots, you can see that the number of instructions executed during the run grows linearly with the number of items in the collection (recall that the array plot has a logarithmic X axis).

mem_array
mem_dict

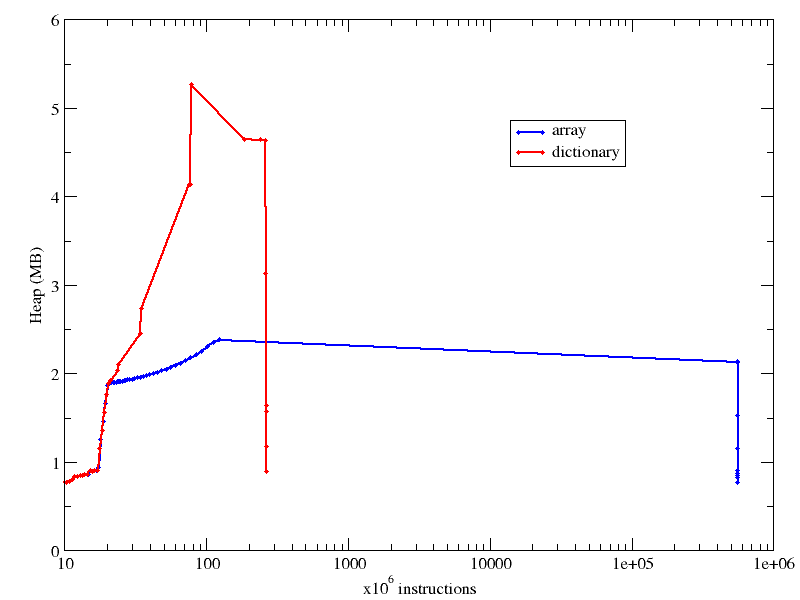
Finally, I compare memory usage of the array and dictionary case in the same plot, as you can see below, for the case of 64k items in the collection:

mem_both

It wasn’t really an easy task, because I had to combine the biggest array case I could handle with the smallest dictionary the timing of which would be meaningful (smaller dictionaries would be equally “immediate”, according to time). Also notice how the X axis has a log scale. Otherwise the number of instructions in the array case would cross the right border of your monitor.

Comments

John maddog Hall and OpenMoko at DebConf9 in Cáceres, Spain

The annual [[Debian]] developers meeting, DebConf is being held this year in Cáceres (Spain), from July 23 to 30. Apart from just promoting the event, I am posting this to mention that the Spanish OpenMoko distributor Tuxbrain will participate, and sell discounted [[Neo FreeRunner]] phones. As a masochistic proud owner of one such phone, I feel compelled to spread the word (and help infect other people with [[FLOSS]] virii).

You can read a post about it in the debconf-announce and debian-devel-announce lists, made by Martin Krafft. Also, Tuxbrain responsible David Samblas uploaded a video of maddog Hall promoting the event:

Comments

Poor Intel graphics performance in Ubuntu Jaunty Jackalope, and a fix for it

Update: read second comment

I recently upgraded to [[Ubuntu]] Jaunty Jackalope, and have experienced a much slower response of my desktop since. The problem seems to be with [[Intel GMA]] chips, as my computer has. The reason for the poor performance is that Canonical Ltd. decided not to include the [[UXA]] acceleration in Jaunty, for stability reasons (read more at Phoronix).

The issue is discussed at the Ubuntu wiki, along with some solutions. For me, the fix involved just making [[X.Org Server|X.org]] use UXA, by including the following in the xorg.conf file, as they recommend in the wiki:

Section "Device"
        Identifier    "Configured Video Device"
        # ...
        Option        "AccelMethod" "uxa"
EndSection

Comments (8)

My Ubuntu Jaunty Jackalope upgrade plan

Well, not much of a “plan”, but bear with me.

Ever since using [[Debian]] and [[Ubuntu]], I have installed the OS just once per computer. All software upgrades, including full releases, have been done through upgrades, not re-installations. This means that I have never actually had the need to download any ISO besides the first one used when I bought the computer.

This is fine, but I always felt the compulsion to share my bandwidth with fellow Linux users, and relieve some load from the [[Canonical Ltd.]] servers. So for every new Ubuntu release, I have downloaded one or more (amd64, i386, desktop, alternate…) Ubuntu CD ISOs via BitTorrent, and kept them uploading for some time. However, the full BT download of the ISO is a waste of bandwidth, and unless my later upload share is greater than 1.0, I will have been overloading the servers, not relieving them.

Now, with Jaunty Jackalope, I have a way to fix this. I could have done similarly with previous releases, but I didn’t. Here’s the deal: download the ISO and share it with BitTorrent, but don’t upgrade from the Internet as well. Upgrade from the ISO I just downloaded! In the past I would be reluctant to do this, among other things because I don’t want to waste a physical CD for that. However, the Ubuntu upgrade instructions say how to mount the ISO (yes, mounting ISOs is not new. I’ve done it in the past), then upgrade from the mounted image. Once the upgrade is done, I can keep seeding the ISO with BitTorrent.

With this procedure I can use bandwidth more efficiently (I download the required software just once), and I can still share the ISO with other people. Moreover, there is another plus: the ISO is just 699 MB, whereas the upgrade manager in Ubuntu tells me that for the upgrade I will need to download more than 1 GB! The difference is due to the ISO being somehow compressed, I think. I will report on the size of the file system mounted from the ISO (which should be much more than 1 GB).

Update: Well, actually the internet upgrade involves more packages. If you upgrade from the CD, you are still required to download 800 more MB to complete the upgrade, so no magic there.

Comments

Brief MoinMoin howto

I recently started looking for some system/format to dump personal stuff on. I checked my own comparison of wiki software, and chose [[MoinMoin]].

I have already installed some [[MediaWiki]] wikis for personal use, and I consider it a really nice wiki system. However, one of its strengths is also a drawback for me: the backend is a database. I want to be able to migrate the wiki painlessly, and with MediaWiki this is not possible. There is no end to the files and database dumps one has to move around, and then it is never clear if there is still something missing (like edit history or some setting). I want to have a single dir with all the data required to replicate the wiki, and I want to [[rsync]] just this dir to another computer to have an instant clone of the wiki elsewhere. MoinMoin provides just that (I think, I might have to change my mind when I use it more).

So here you are the steps I took to have MM up and running in my Ubuntu 8.10 PC.

Installation

Ubuntu has packages for MM, so you can just install them:

% aptitude install python-moinmoin moinmoin-common

Configuration

Create a dir to put your wiki. For example, if you want to build a wiki called wikiname:

% mkdir -p ~/MoinMoin/wikiname

We made it a subdir of a global dir “MoinMoin”, so we can create a wiki farm in the future.

Next you have to copy some files over:

% cd ~/MoinMoin/wikiname
% cp -vr /usr/share/moin/data .
% cp -vr /usr/share/moin/underlay .
% cp /usr/share/moin/config/wikiconfig.py .
% cp /usr/share/moin/server/wikiserver.py .

If installing a wiki farm, you could be interested in the contents of /usr/share/moin/config/wikifarm/, but this is out of the scope of this post.

The next step is to edit wikiconfig.py to our liking. The following lines could be of interest:

sitename = u’Untitled Wiki’
logo_string = u’MoinMoin Logo
page_front_page = u”MyStartingPage”
data_dir = ‘./data/’
data_underlay_dir = ‘./underlay/’
superuser = [u”yourusername“, ]
acl_rights_before = u”iyourusername:read,write,delete,revert,admin”

Using

You just need to run wikiserver.py, there is no need to have [[Apache HTTP Server|Apache]] running or anything (like with, e.g., MediaWiki):

% cd ~/MoinMoin/wikiname/
% python wikiserver.py &

Then open your favourite browser and go to http://localhost:8080, and you will be greeted by the starting page.

Comments (4)

LWD – March 2009

Did I say “bimonthly” in my last report? Mmm, that was 3 months ago… You can read an intro for my Linux World Domination project in this May 2008 post.

As usual D2D means “days to domination” (the expected time for Windows/Linux shares to cross, counting from the present date), and DD2D means difference (increase/decrease) in D2D, with respect to last report. CLP means “current Linux Percent”, as given by last logged data, and DD means domination day (in YYYY-MM-DD format).

Project D2D DD2D DD CLP Confidence %
Einstein 107 -144 2009-06-26 42.09 (+4.61) 17.3
MalariaControl >10k 12.55 (+0.10)
POEM 5345 +325 2023-10-30 10.47 (+0.42) 2.5
Rosetta >10k 8.09 (+0.10)
QMC >10k 7.87 (-0.04)
SETI >10k 7.94 (+0.06)
Spinhenge >10k 3.59 (+0.24)

As promised, today I’m showing the plots for POEM@home, in next issue Prime@home.

Number of hosts percent evolution for POEM@home (click to enlarge)

Accumulated credit percent evolution for POEM@home (click to enlarge)

Comments

Free software woes

Yes, [[FLOSS]] also has its quirks and problems, and I am going to rant about some of them, that I run into the last week.

Problem 1: fsck on laptops

The reader might know that Linux comes with a collection of file system checkers/fixers, under the name fsck.* (where * = ext2/3, reiserfs, jfs, xfs…). When one formats a new partition (or tunes an existing one), some parameters are set, as for example in what circumstances fsck should be run automatically (you can always run it by hand). The typical setting is to run the command on each partition (just before mounting it) every N times it is mounted, or every M days.

It is also set that if a filesystem is not shut down cleanly (e.g., by crashing the computer or directly unplugging it), fsck will be run automatically on next boot (hey, that’s so nice!).

However, here’s the catch: on laptops, and with the aim of saving power, fsck will (tipically) not run automatically when on batteries. This seems a great idea, but you can imagine an scenario where it fails: shut down the laptop uncleanly, then power it up on batteries, and… voilà, you are presented with a system that seems to boot, but gives a lot of problems, the X don’t work… because the disk was corrupt, and wasn’t fixed on boot.

When this happened to me, I fixed it by booting while plugged. In principle you could also boot on single user mode, then chose “Check the filesystem” in the menu you will be presented (I’m talking about Ubuntu here), and fix the problem, even on batteries. But still, it’s annoying. IMHO fsck should run after unclean shutdowns, no matter being plugged or on batteries.

Problem 2: failed hibernate can seriously screw your system

I tried [[Hibernate (OS feature)|hibernating]] my laptop (a feature I keep finding problems with), but it was taking too long, and I was forced to shut it down using the power button. This, in itself, is a serious issue, but I could live with it.

But what I can’t live with is that after the event, I had no way of booting back! I tried all I could, and finally had to reinstall the OS. I am the one whom it happened to, and I still find it hard to believe: Linux so fucked up that you have to reinstall. I thought reinstalling belonged to the Windows Dark Ages!

Problem 3: faulty SD card

Since the problems tend to come together, it’s no surprise that I came across this error when trying to reinstall the machine borked with previous problem. The thing is that I was using a SD card as installation media, burning the ISO into it with [[UNetbootin]]. The burning didn’t burp any error, but the installation failed, usually (but not always) on the same point.

After minutes (hours?) of going crazy, I burned the ISO into another SD card, and it worked like a charm.

My complain is not that the SD was faulty, which I can understand (hardware fails). What I am angry at is the fact that I checked (with the aforementioned fsck command) the FS in the card many times, and I reformatted it (with mkfs) many more times, and Linux would always say that the formatting had been correct, and that all checks where fine. I understand that things are sometimes OK, sometimes KO. I just want to know when is which!

Comments (5)

« Previous Page« Previous entries « Previous Page · Next Page » Next entries »Next Page »