Desktop environment manipulation from the command line

I recently discovered Regnum Online, a very good [[MMORPG]], with two interesting properties: it has a native Linux version, and is free to download and play (NGD, its owner, gets revenue through so called “premium items”, which are sold for real money. Premium items are not really necessary to play, but include convenience items like mounts, to travel faster than on foot).

It so happens that Regnum can be played either in windowed mode, or fullscreen. Obviously the latter takes advantage of the whole screen, but sadly it can not be minimized or alt-tabbed to a different window. Being able to minimize the Regnum window and switching to another task is interesting, for example, to leave your character resting after a battle (it takes some time to heal back to normality), and checking your e-mail meanwhile. However, playing in windowed mode feels uncomfortable, with not all the screen being used, and having your desktop bars above and/or below the window you are playing on.

To have the advantages of both windowed and fullscreen mode at the same time (and none of their disadvantages), I thought of the following: I can play on 1440×900 resolution (my whole screen), hiding the top and bottom bars (I use [[GNOME]], with both bars), and getting rid of the window decoration of the Regnum window (which would eat some of the 900 vertical pixels). While we are at it, it would be cool to stop [[Compiz Fusion]] before running Regnum (to dedicate the whole video card to the game), and starting it again after closing it.

The problem is, I do not like to have autohiding panels in GNOME, and I like window decorations and Compiz effects, so the desktop settings for playing would have to be turned on before playing, and off after that. The next problem in the line is that I don’t like performing repetitive tasks such as pointing, clicking and choosing options from menus every time I feel like playing a game. Since I already click a button to start Regnum, it would be cool to have all configuration stuff happen by just clicking that same button. Obviously, that means automating all the configuration by placing the corresponding commands in a script, and making the Regnum button execute that script.

Stopping Compiz

That part was easy. We want to switch from Compiz to [[Metacity]], which can be done with:

metacity --replace

Autohiding GNOME panels

Some googling yielded this ubuntu-tutorials page, which led me to:

gconftool-2 --set "/apps/panel/toplevels/top_panel_screen0/auto_hide" --type bool "true"
gconftool-2 --set "/apps/panel/toplevels/bottom_panel_screen0/auto_hide" --type bool "true"

Eliminating window decorations

All you can google about it will lead you to a little wonder called Devil’s Pie. In short, it’s a kind of daemon that checks for windows that match some user-defined rules, and performs on them the corresponding user-defined actions.

In my case, I defined a rule (in ~/.devilspie/regnum.ds):

(if
    (is (application_name) "Untitled window")
    (begin
        (undecorate)
    )
)

Running devilspie from the command line will show the properties of all open windows, which will help you create the appropriate condition for the rule. In my case, apparently the final Regnum window is identified only as “Untitled window”.

Running Regnum, and waiting for it to finish

Waiting for Regnum to finish is not trivial, since once fully running it returns the control to the shell. For that reason, the following will not work:

$ echo "start"
$ regnum-online
$ echo "end"

It will echo “start”, then start Regnum, then echo “end”, while Regnum is still running. To fix that, I added a loop to my script, which only exits once Regnum has finished. There must be more elegant and less hacky ways of doing it, but this one works:

while [[ -n "`ps aux| grep -e regnum-online -e "./game" | grep -v grep`" ]]
do
    sleep 5
done

Every 5 seconds, it runs some ps command, and exits when the output is empty. The command itself is a simple grep to a ps, adding the grep -v grep so that the grep command is not catched by itself.

After closing Regnum, and whole script

So, after the while loop above exits, all we have to do is undo the settings changes we just did, and exit. The whole script would read:

#!/bin/bash

# Substitute Compiz with Metacity:
metacity --replace &

# Autohide top and bottom pannels:
gconftool-2 --set "/apps/panel/toplevels/top_panel_screen0/auto_hide" --type bool "true"
gconftool-2 --set "/apps/panel/toplevels/bottom_panel_screen0/auto_hide" --type bool "true"

# Run devilspie, to remove decoration in Regnum Online windows:
/usr/bin/devilspie &

# Run Regnum Online:
/usr/bin/regnum-online

# Wait until RO finishes:
while [[ -n "`ps aux| grep -e regnum-online -e "./game" | grep -v grep`" ]]
do
    sleep 5
done

# Kill devilspie:
killall devilspie

# Show top and bottom pannels:
gconftool-2 --set "/apps/panel/toplevels/top_panel_screen0/auto_hide" --type bool "false"
gconftool-2 --set "/apps/panel/toplevels/bottom_panel_screen0/auto_hide" --type bool "false"

# Run Compiz again:
compiz --replace --sm-disable --ignore-desktop-hints ccp --loose-binding --indirect-rendering &

Finally, I just named this script “RegnumRun.sh”, made it executable, placed it in a suitable place, and associated the Regnum icon on my top panel with RegnumRun.sh, instead of with regnum-online directly, and voilà: every time I click on that icon I get to play Regnum with purpose-chosen settings, and I get my regular settings back once I exit Regnum.

Comments

Tiny introduction to GNU Terminator

Some weeks ago, I came across this little wonder called GNU Terminator (or “GNOME” Terminator). It is an unfortunate coincidence that there is another similar tool with the same name (Terminator). I am not going to judge which one is “better”. I just use the one at tenshu.net, which is the one that [[Arch Linux]] ships as package “terminator”.

Terminator is a terminal emulator that allows for splitting of the window into several smaller terminals. Its main advantage over just using tabs (which Terminator can also do), is that all windows are simultaneously visible (main obvious drawback: they are smaller). Its main advantage over opening multiple terminals and tiling them is that (except if a [[tiling window manager]] is used, which would also have this advantage) is that Terminator automaticaly avoids overlaps, while maximizing the space usage. Some tools, such as the Grid module of [[Compiz Fusion]] can arrange windows similarly. Actually, I have been using this module extensively, and I still do. However, Terminator is more convenient, both because it allows arbitrary sizes (Grid allows windows to occupy an integer number of virtual screen sections, in an imaginary 3×3 grid), and because resizing a sub-terminal automatically adapts all the others, avoiding overlapping and wasting space.

I uploaded a short video to YouTube, showing a basic usage of Terminator. Below the video you can read some explanations of what you see:

We start by opening a Terminator window, and maximizing it. Next, we split the window into 4 terminals. We first split the original terminal vertically, with Ctrl-Shift-o (with a “horizontal” line), then we split each terminal horizontally with Ctrl-Shift-e (with a vertical line). We can act on each terminal individually. To navigate the terminals with the keyboard: Alt-Left for left, etc.

We continue by resizing the terminals. The borders separating the terminals are actually grab bars, so we can drag them with the mouse to move those boundaries, so the terminals resize accordingly. With the keyboard: Ctrl-Shift-Left grows the current terminal (the one with the cursor) to the left, etc.

Apart from tiled terminals, we have access to tabs. To open one, right-click with mouse and select “Open Tab” in the context menu, or with the keyboard: Ctrl-Shift-t. Move from tab to tab with Shift-Left and Right.

Finally, we close the terminals we don’t need anymore, and the remaining ones adapt, to always maximize the space used. Closing all terminals will, of course, close Terminator.

Comments (2)

The nightmare of tagging multiple photos with digiKam, and a hacky way around it. Part II

Yesterday I posted about how to put multiple tags in tons of pictures, with [[digiKam]]. Apparently, the method I described there does not work (blame it on digiKam, of course). Still, the post makes for an interesting reading (hey, I am the author. What would I say?).

Here I’ll describe a new way to acomplish what the previous method couldn’t. If you want to know what on Earth I’m talking about, read the The problem section of the previous post.

Fairy tale-like solution

I found out how to implement a solution much like the one in the Fairy tale solution section of my previous post. Question: what is the next best thing to a single keystroke to tag a file? Answer: a single mouse click.

Following our ideal method, we will do a visual scan of all photos, one by one, succesively tagging (or ignoring) each file in which a certain person appears (or doesn’t). The tagging will be done by a single mouse click (right hand always on mouse), and the photos will advance with space bar strokes (left thumb always on space bar).

To do so, one must go to the first picture in the set, and maximize it. Next, open the right panel, and go to the Captions/Tags tab. Find the tag of the person you are dealing with in the tag tree, and place the mouse over it. See the following screenshot (click on it to maximize):

I assure you the fabled person A is hidding somewhere within those Cuban trees

Now, place your left hand on the keyboard (to hit the space bar), and let the fun begin. Each time person A appears in a photo, left-click with the mouse (never ever move the pointer from the tag. Space bar will make the photos advance wherever the mouse pointer is). When it doesn’t, ignore and go on. When you reach the last pic, rinse, and repeat for persons B through Z.

With this method I tagged 197 pictures in under one hour yesterday. A bit over 3 pictures tagged per minute does not look too impressive, but the 197 pictures contained 9 different persons (9 tags to apply), each one of which appeared in roughly 30 pictures. This means I did 9 slide shows of all the pictures, applying a total of more than 250 tags.

Linearly scaling method

The above method is very fast with respect to each tag applied. However it scales up quite badly, because it is slower the more pictures one has to tag (obviously), and also the more different tags one is applying (one full scan of the picture set per individual tag to apply). The dependency with pic count is unavoidable, but let’s see if we can devise a way to reduce the impact of the latter.

We begin by grouping all the potential tags (say, all people who appear in the set of pictures) within a single parent tag (see following screenshot):

A’s friend, C, is somewhere over there, as well. Do you C him?

Now, we can follow steps similar to the ones above, for the fairy tale method, but for each picture we will apply tags for all people appearing in it. This will make tagging each picture slower, but will require a single pass. Doesn’t a single N-times-slower pass take as long as N fast passes? Yes. But recall our single pass here will not take N times longer (assuming N people to tag for). A lot of pictures with no people on it will be just as fast to (not) tag as in the method above, plus most photos will feature one or two people, and very seldom will all N people appear together, so this single pass will not be N-times slower than our N passes above.

[Update]: After writing this post, I put the second method here to test, and tagged almost 1300 pics in one hour!

Comments (2)

The nightmare of tagging multiple photos with digiKam, and a hacky way around it

[Update and big fat warning]: apparently, renaming or moving files does mess with the tags the image already has. A way around this, and maybe a generally good idea (use your own judgement on that one), is to make digiKam save the tags as [[metadata]] into the picture files themselves. On the con side, tagging your pictures will actually modify the files (maybe you don’t want that), but on the pro side, the tags will travel along with the files, no matter what name or location they have (even to other computers, which may or may not be what you want).

[Update #2]: apparently the metadata approach doesn’t work either. It seems that each time a tag is assigned, the metadata is immediately saved (which is great), but only the tags digiKam is aware of at that moment. Also, digiKam is not immediately aware of the tag metadata of the pics it’s showing (you have to tell him so, I think). Let’s say you tag a pic as “A”. Metadata for “A” is saved. OK. Now, you change the name of the file, and digiKam loses track of it. You rename back, and digiKam thinks the picture has no tag (the metadata is obviously still there, inside the file, but digiKam doesn’t read it until you tell it to). Now, you assign tag “B” to the picture, expecting the file to end up with both tags: A and B. Tough luck. The split second you tag the file with “B”, it is written to the metadata (OK), but only tag B is written (the only one digiKam is aware of at that moment), so tag “A” is lost. In two words: the following post is full of crap. If a third word is allowed, let me say that digiKam is too.

First off, let me admit that my problem might have a simple solution. Maybe my goal is much simpler to achieve than I think. But what I am doing seems fairly common to me, and a pain-free recipe to do it escapes me.

The problem

I use [[digiKam]] to manage my photo collection. A very handy (and basic) function of digiKam is to tag photos. I tag photos with three criteria: where it was taken (e.g. “Donostia”), the event it can be framed within (e.g. “Wedding of A and B”), and a tag per person that appears in it (e.g. “John Smith”, “Jane Doe” and “Janet Johnson”). It involves some work, but afterwards I can really easily find say, all pictures in which John Smith and Jane Doe appear together, in any place but Donostia. Why I would want to do that is anyone’s guess, but that’s offtopic.

Every time I have a batch of photos (say, a wedding or some holidays), I sit down in front of my computer, and tag evey one of them. Tagging by event is a breeze (99.9% of the time, the whole batch of pics belongs to the same event), and tagging by location is also simple (each pic has a single location, and many, if not all, share that location). However, tagging by person is a bit trickier. Each photo can have many (or no) people appearing on it, plus it takes a bit of attention to spot all people appearing.

When tagging by people, two approaches can be taken:

  1. Parse photo by photo, tagging each one once per person appearing on it. Don’t move to the next photo until tags for eveyone appearing on current one have been asigned.
  2. Parse whole batch, once per person. You pick a person, select all pics where she appears, then you tag all of them simultaneously. Repeat for each person.

I have found that, for large amounts of pictures, the second approach is fairly superior. However, it is not problem-free. Firstly, multiple selection is only possible in a grid view. That is, pictures are presented as [[thumbnails]], aligned in columns and rows. Even in the largest possible size for such pictures, often times there are many photos that are too small to spot all people in them. Secondly, having selected some dozens of pictures out of some hundreds, and mistakenly unselecting them by clicking where you shouldn’t, or failing to hold the Ctrl key when clicking (or whatever error whose probability to happen increases with the amount of pictures to tag) is just painful.

Fairy tale solution

I realized a hybrid method would be advantageous, but that’s where the problem comes: I find no simple way to accomplish it. I would like to be able to do the following comfortably: inspect the photos one by one, tagging each one in which person A appears. When all are tagged, repeat for person B, and so on. Right now this approach will take longer than either approaches above, because it borrows the worse characteristics from both (one-by-one tagging of method 1, scanning all the photos repeatedly, once per person, from method 2). The reason for that is that asigning a single tag to a single photo is cumbersome. You right-click on the photo, then select “Assign Tag” from the menu that appears, then choose a tag from the drop-down menu (and submenus if case be).

There is no shortcut that one can assign to some tag, or, even better, a single-key shortcut for “assign to this photo the last tag I have assigned to the previous one”. If there was, my hybrid approach would be really fast: take person A, appearing in picture 1. Tag pic 1 with “A”. Then go picture by picture (a single hit of the space bar), either ignoring the pics where person “A” does not appear, or pressing the “apply last tag” shortcut (a single keystroke) where she does.

Hacky solution

Of the tools that digiKam offers, which one can modify a photo in a way that the contents are not touched, yet we can group them afterwards based on that change? Easy: rename (F2 key). When you press F2, a rename dialog appears, with a field where you can enter the new name for the currently selected pic. The good thing is the field is already filled with the current name of the photo. So, if you want to rename a photo to, say, the same name but with a trailing dot, all you have to do is press the sequence: F2 + . + Enter.

Now, how on Earth would the renaming help? Well, we could use the above “trick” to quickly rename all pictures in which person A appears, making all of them have the same name, but with a trailing dot added. Then, we could Alt-Tab to a terminal, cd to the dir where the photos reside, and execute the following ([[Z shell|zsh]] syntax, translate to your favorite shell):

% mkdir totag
% for file in *.; mv $file totag/`echo $file | sed ‘s/.$//’`

That will put all files ending in a dot inside a subfolder called “totag”, renaming them back to their original name (chopping off the last character, which would be the dot). Don’t forget the fact that these files happen to be all in which person A appears. Recall as well that digiKam keeps track of the tags applied to each photo by its [[md5sum]] (OK, I made that up, but it must be true), so moving files around and/or renaming them (both things are one and the same, actually) doesn’t mess with the tags. (see warning at the top of this post).

So, once all pics with person A reside in folder “totag”, we can Alt-Tab back to digiKam, go to that folder, select all pics, and tag them all at once. After that, Alt-Tab to the terminal, and execute:

% mv totag/* .

The real beauty of using a shell for that (even with the apparently complicated command with the for loop above), is that you can reuse the commands trivially. For person B, once all relevant photos have been renamed with a dot, Alt-Tab to the terminal, hit the Up arrow twice, then Enter, and you will move and rename all files again in just three keystrokes (two of them being the same key hit twice). Alt-Tab to digiKam, tag all pics in the “totag” dir. Alt-Tab to the terminal, Up+Up+Enter (which now executes the mv), and you have the files in the main dir again.

Conclusion

Yeah, I bet right now you are considering whether my idea of what is “simple” or “comfortable” is seriously off. I’d still vote for the “Reapply last tag” shortcut in digiKam. It would make a three-keystroke step (F2+.+Enter, to rename) a single keystroke one (reapply last tag with shortcut), plus would make the steps involving the terminal unnecessary. But reality is a bitch, and we don’t have such a shortcut. I could either just rant about it on my blog, or go ahead and find a solution myself. I chose to do both :^)

Comments (4)

Please, choose the right format to send me that text. Thanks.

I just received an e-mail with a very interesting text (recipies for [[Pincho|pintxos]]), and it prompted some experiment. The issue is that the text was inside of a [[DOC (computing)|DOC]] file (of course!), which rises some questions and concerns on my side. The size of the file was 471 kB.

I thought that one could make the document more portable by exporting it to [[PDF]] (using [[OpenOffice.org]]). Doing so, the resulting file has a size of 364 kB (1.29 times smaller than the original DOC).

Furthermore, text formatting could be waived, by using a [[plain text]] format. A copy/paste of the contents of the DOC into a TXT file yielded a 186 kB file (2.53x smaller).

Once in the mood, we can go one step further, and compress the TXT file: with [[gzip]] we get a 51 kb file (9.24x), and with [[xz]] a 42 kB one (11.2x)

So far, so good. No surprise. The surprise came when, just for fun, I exported the DOC to [[OpenDocument|ODT]]. I obtained a document equivalent to the original one, but with a 75 kB size! (6.28x smaller than the DOC).

So, for summarizing:

DOC

Pros

  • Editable.
  • Allows for text formatting.

Cons

  • Proprietary. In principle only MS Office can open it. OpenOffice.org can, but because of reverse engineering.
  • If opened with OpenOffice.org, or just a different version of MS Office, the reader can not be sure of seeing the same formatting the writer intended.
  • Size. 6 times bigger than ODT. Even bigger than PDF.
  • MS invented and owns it. You need more reasons?

PDF

Pros

  • Portability. You can open it in any OS (Windows, Linux, Mac, BSD…), on account of there being so many free PDF readers.
  • Smaller than the DOC.
  • Allows for text formatting, and the format the reader sees will be exactly the one the writer intended.

Cons

  • Not editable (I really don’t see the point in editing PDFs. For me the PDF is a product of an underlying format (e.g. LaTeX), as what you see on your browser is the product of some HTML/PHP, or an exe is the product of some source code. But I digress.)
  • Could be smaller

TXT

Pros

  • Portability. You can’t get much more portable than a plain text file. You can edit it anywhere, with your favorite text editor.
  • Size. You can’t get much smaller than a plain text file (as it contains the mere text content), and you can compress it further with ease.

Cons

  • Formatting. If you need text formatting, or including pictures or content other than text, then plain text is not for you.

ODT

Pros

  • Portability. It can be edited with OpenOffice.org (and probably others), which is [[free software]], and has versions for Windows, Linux, and Mac.
  • Editability. Every bit as editable as DOC.
  • Size. 6 times smaller files than DOC.
  • It’s a free standard, not some proprietary rubbish.

Cons

  • None I can think of.

So please, if you send me some text, first consider if plain text will suffice. If not, and no edition is intended on my side, PDF is fine. If edition is important (or size, because it’s smaller than PDF), the ODT is the way to go.

Comments (7)

Speed up PyGTK and Cairo by reusing images

As you might have read in this blog, I own a Neo FreeRunner since one year ago. I have used it far less than I should have, mostly because it’s a wonderful toy, but a lousy phone. The hardware is fine, although externally quite a bit less sexy than other smartphones such as the iPhone. The software, however, is not very mature. Being as open as it is, different Linux-centric distros have been developed for it, but I haven’t been able to find one that converts the Neo into an everyday use phone.

But let’s cut the rant, and stick to the issue: that the Neo is a nice playground for a computer geek. Following my desire to play, I installed Debian on it. Next, I decided to make some GUI programs for it, such a screen locker. I found Zedlock, a program written in Python, using GTK+ and Cairo. Basically, Zedlock paints a lock on the screen, and refuses to disappear until you paint a big “Z” on the screen with your finger. Well, that’s what it’s supposed to do, because the 0.1 version available at the Openmoko wiki is not functional. However, with Zedlock I found just what I wanted: a piece of software capable of doing really cool graphical things on the screen of my Neo, while being simple enough for me to understand.

Using Zedlock as a base, I am starting to have real fun programming GUIs, but a problem has quickly arisen: their response is slow. My programs, as all GUIs, draw an image on the screen, and react to tapping in certain places (that is, buttons) by doing things that require that the image on the screen be modified and repainted. This repainting, done as in Zedlock, is too slow. To speed things up, I googled the issue, and found a StackOverflow question that suggested the obvious route: to cache the images. Let’s see how I did it, and how it turned out.

Material

You can download the three Python scripts, plus two sample PNGs, from: http://isilanes.org/pub/blog/pygtk/.

Version 0

You can download this program here. Its main loop follows:

C = Canvas()

# Main window:
C.win = gtk.Window()
C.win.set_default_size(C.width, C.height)

# Drawing area:
C.canvas = gtk.DrawingArea()
C.win.add(C.canvas)
C.canvas.connect('expose_event', C.expose_win)

C.regenerate_base()

# Repeat drawing of bg:
try:
  C.times = int(sys.argv[1])
except:
  C.times = 1

gobject.idle_add(C.regenerate_base)
C.win.show_all()

# Main loop:
gtk.main()

As you can see, it generates a GTK+ window (line 04), with a DrawingArea inside (line 08), and then executes the regenerate_base() function every time the main loop is idle (line 20). Canvas() is a class whose structure is not relevant for the discussion here. It basically holds all variables and relevant functions. The regenerate_base() function follows:

def regenerate_base(self):
    
    # Base Cairo Destination surface:
    self.DestSurf = cairo.ImageSurface(cairo.FORMAT_ARGB32, self.width, self.height)
    self.target   = cairo.Context(self.DestSurf)
  
    # Background:
    if self.bg == 'bg1.png':
      self.bg = 'bg2.png'
    else:
      self.bg = 'bg1.png'

    self.i += 1

    image       = cairo.ImageSurface.create_from_png(self.bg)
    buffer_surf = cairo.ImageSurface(cairo.FORMAT_ARGB32, self.width, self.height)
    buffer      = cairo.Context(buffer_surf)
    buffer.set_source_surface(image, 0,0)
    buffer.paint()
  
    self.target.set_source_surface(buffer_surf, 0, 0)
    self.target.paint()
  
    # Redraw interface:
    self.win.queue_draw()

    if self.i > self.times:
      sys.exit()

    return True

As you can see, it paints the whole window with a PNG file (lines 15-25), choosing alternately bg1.png and bg2.png each time it is called (lines 07-11). Since the re-painting is done every time the main event loop is idle, it just means that images are painted to screen as fast as possible. After a given amount of re-paintings, the script exits.

You can run the code above by placing two suitable PNGs (480×640 pixels) in the same directory as the above code. If an integer argument is given to the script, it re-paints the window that many times, then exits (default, just once). You can time this script by executing, e.g.:

% /usr/bin/time -f %e ./p0.py 1000

Version 1

You can download this version here.

The first difference with p1.py is that the regenerate_base() function has been separated into the first part (generate_base()), which is executed only once at program startup (see below), and all the rest, which is executed every time the background is changed.

def generate_base(self):

    # Base Cairo Destination surface:
    self.DestSurf = cairo.ImageSurface(cairo.FORMAT_ARGB32, self.width, self.height)
    self.target   = cairo.Context(self.DestSurf)

The main difference, though, is that two new functions are introduced:

  def mk_iface(self):

    if not self.bg in self.buffers:
      self.buffers[self.bg] = self.generate_buffer(self.bg)

    self.target.set_source_surface(self.buffers[self.bg], 0, 0)
    self.target.paint()

  def generate_buffer(self, fn):

    image       = cairo.ImageSurface.create_from_png(fn)
    buffer_surf = cairo.ImageSurface(cairo.FORMAT_ARGB32, self.width, self.height)
    buffer      = cairo.Context(buffer_surf)
    buffer.set_source_surface(image, 0,0)
    buffer.paint()
  
    # Return buffer surface:
    return buffer_surf

The function mk_iface() is called within regenerate_base(), and draws the background. However, the actual generation of the background image (the Cairo surface) is done in the second function, generate_buffer(), and only happens once per each background (i.e., twice in total), because mk_iface() reuses previously generated (and cached) surfaces.

Version 2

You can download this version here.

The difference with Revision 1 is that I eliminated some apparently redundant procedures for creating surfaces upon surfaces. As a result, the generate_base() function disappears again. I get rid of the DestSurf and C.target variables, so the mk_iface() and expose_win() functions end up as follows:

  def mk_iface(self):

    if not self.bg in self.buffers:
      self.buffers[self.bg] = self.generate_buffer(self.bg)

    buffer = self.canvas.window.cairo_create()
    buffer.set_source_surface(self.buffers[self.bg],0,0)
    buffer.paint()

  def expose_win(self, drawing_area, event):

    nm = 'bg1.png'

    if not nm in self.buffers:
      self.buffers[nm] = self.generate_buffer(nm)

    ctx = drawing_area.window.cairo_create()
    ctx.set_source_surface(self.buffers[nm], 0, 0)
    ctx.paint()

A side effect is that I can get also rid of the forced redraws of self.win.queue_draw().

Results

I have run the three versions above, varying the C.times variable, i.e., making a varying number of reprints. The command used (actually inside a script) would be something like the one mentioned above:

% /usr/bin/time -f %e ./p0.py 1000

The following table sumarizes the results for Flanders and Maude (see my computers), a desktop P4 and my Neo FreeRunner, respectively. All times in seconds.

Flanders
Repaints Version 0 Version 1 Version 2
1 0.26 0.43 0.33
4 0.48 0.40 0.42
16 0.99 0.43 0.40
64 2.77 0.76 0.56
256 9.09 1.75 1.15
1024 37.03 6.26 3.44
Maude
Repaints Version 0 Version 1 Version 2
1 4.17 4.70 5.22
4 8.16 6.35 6.41
16 21.58 14.17 12.28
64 75.14 44.43 35.76
256 288.11 165.58 129.56
512 561.78 336.58 254.73

Data in the tables above has been fitted to a linear equation, of the form t = A + B n, where n is the number of repaints. In that equation, parameter A would represent a startup time, whereas B represents the time taken by each repaint. The linear fits are quite good, and the values for the parameters are given in the following tables (units are milliseconds, and milliseconds/repaint):

Flanders
Parameter Version 0 Version 1 Version 2
A 291 366 366
B 36 6 3
Maude
Parameter Version 0 Version 1 Version 2
A 453 3218 4530
B 1092 648 487

Darn it! I have mixed feelings for the results. In the desktop computer (Flanders), the gains are huge, but hardly noticeable. Cacheing the images (Version 1) makes for a 6x speedup, whereas Version 2 gives another twofold increase in speed (a total of 12x speedup!). However, from a user’s point of view, a 36 ms refresh is just as immediate as a 6 ms refresh.

On the other hand, on the Neo, the gains are less spectacular: the total gain in speed for Version 2 is a mere 2x. Anyway, half-a-second repaints instead of one-second ones are noticeable, so there’s that.

And at least I had fun and learned in the process! :^)

Comments (2)

LWD – March 2010

This is a continuation post for my Linux World Domination project, started in this May 2008 post. You can read the previous post in the series here.

In the following data T2D means “time to domination” (the expected time for Windows/Linux shares to cross, counting from the present date). DT2D means difference (increase/decrease) in T2D, with respect to last report. CLP means “current Linux Percent”, as given by last logged data, and DD means domination day (in YYYY-MM-DD format), and DCLP means “difference in CLP”, with respect to last logged data.

Project T2D DT2D DD CLP DCLP
Einstein already crossed September 2009 54.80 +3.45
MalariaControl >10 years 12.12 +0.17
PrimeGrid >10 years 11.78 +1.47
POEM >10 years 11.52 +0.69
Rosetta >10 years 8.61 +0.01
SETI >10 years 8.12 +0.05
QMC >10 years 8.11 -0.12
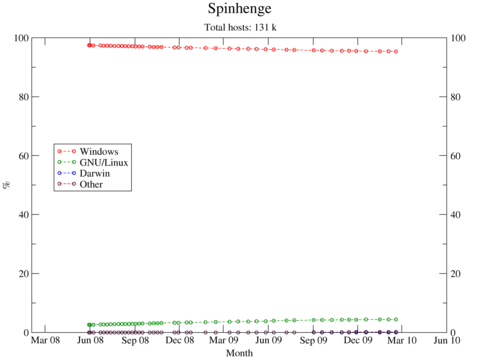
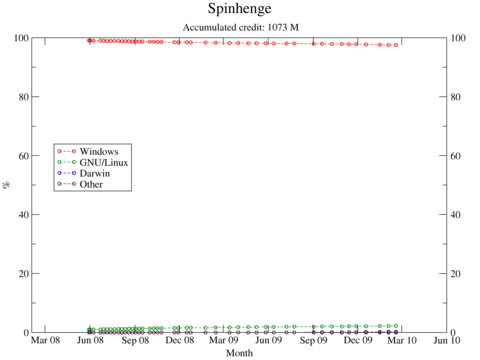
Spinhenge >10 years 4.46 +0.09

The numbers (again) seem a bit discouraging, but the data is what it is. Now MalariaControl goes up (it went down in previous report), but QMC goes slightly down. All others go up. The Linux tide seems unstoppable, however its forward speed is not necessarily high.

As promised, today I’m showing the plots for Spinhenge@home. In next issue, QMC@home.

Number of hosts percent evolution for Spinhenge@home (click to enlarge)

Accumulated credit percent evolution for Spinhenge@home (click to enlarge)

Comments

Avoiding time_increment_bits problem when encoding bad header MPEG4 videos to Ogg Theora

There is some debate going on lately about the migration of YouTube to [[HTML5]], and whether they (i.e. YouTube’s owner, Google) should support [[H.264]] or [[Theora]] as standard codecs for the upcoming <video> tag. See, for example, how the FSF asks for support for Theora.

The thing is, I discovered [[x264]] not so long ago, and I thought it was a “free version” of H.264. I began using it to reencode the medium-to-low quality videos I keep (e.g., movies and series). The resulting quality/file size ratio stunned me. I could reencode most material downloaded from e.g. p2p sources to 2/3 of their size, keeping the copy indistinguishable from the original with the bare eye.

However, after realizing that x264 is just a free implementation of the proprietary H.264 codec, and in the wake of the H.264/Theora debate, I decided to give Ogg Theora a go. I expected a fair competitor to H.264, although still noticeably behind in quality/size ratio. And that I found. I for one do not care if I need a 10% larger file to attain the same quality, if it means using free formats, so I decided to adopt Theora for everyday reencoding.

After three paragraphs of introduction, let’s get to the point. Which is that reencoding some files with [[ffmpeg2theora]] I would get the following error:

% ffmpeg2theora -i example_video.avi -o output.ogg
[avi @ 0x22b7560]Something went wrong during header parsing, I will ignore it and try to continue anyway.
[NULL @ 0x22b87f0]hmm, seems the headers are not complete, trying to guess time_increment_bits
[NULL @ 0x22b87f0]my guess is 15 bits ;)
[NULL @ 0x22b87f0]looks like this file was encoded with (divx4/(old)xvid/opendivx) -> forcing low_delay flag
Input #0, avi, from 'example_video.avi':
  Metadata:
    Title           : example_video.avi
  Duration: 00:44:46.18, start: 0.000000, bitrate: 1093 kb/s
    Stream #0.0: Video: mpeg4, yuv420p, 624x464, 23.98 tbr, 23.98 tbn, 23.98 tbc
    Stream #0.1: Audio: mp3, 48000 Hz, 2 channels, s16, 32 kb/s
  .

[mpeg4 @ 0x22b87f0]hmm, seems the headers are not complete, trying to guess time_increment_bits
[mpeg4 @ 0x22b87f0]my guess is 16 bits ;)
[mpeg4 @ 0x22b87f0]hmm, seems the headers are not complete, trying to guess time_increment_bits
[mpeg4 @ 0x22b87f0]my guess is 16 bits ;)
[mpeg4 @ 0x22b87f0]looks like this file was encoded with (divx4/(old)xvid/opendivx) -> forcing low_delay flag
    Last message repeated 1 times
[mpeg4 @ 0x22b87f0]warning: first frame is no keyframe

I searched the web for solutions, but to no avail. Usually pasting literal errors in Google yields good results, but in this case I only found developer forums where this bug was discussed. What I haven’t found is simple instructions on how to avoid it in practice.

Well, here it goes my simple solution: pass it through [[MEncoder]] first. Where the following fails:

% ffmpeg2theora -i input.avi -o output.ogg

the following succeeds:

% mencoder input.avi -ovc copy -oac copy -o filtered.avi
% ffmpeg2theora -i filtered.avi -o output.ogg

I guess that what happens is basically that mencoder takes the “raw” video data in input.avi and makes a copy into filtered.avi (which ends up being exactly the same video), building sane headers in the process.

Comments (3)

Amarok WTF

Warning: the following rant could be caused by my idiocy, more than by Amarok’s fault. See comments.

I have been using [[Amarok (software)|Amarok]] as music player even since I had first contact with it. I was really delighted with its capabilities, and everything was intuitive and useful in its [[User Interface|UI]]. That was until version 1.4.x.

Version 2.0 was an almost complete rewrite of the code, and as such many things changed. The UI suffered a large redesign, in my opinion for worse… but that’s just an opinion. There are, however, other issues that are facts, not opinion. Amarok 2.0 lacked many of the features of Amarok 1.x, as the developers themselves admitted (not much room to deny). Fine, I have no problem with that. It is understandable: until version 2.x things will not settle down. The only problem is that Linux distros (at least Ubuntu) adopted Amarok 2.0 almost immediately, leaving us users with a broken toy. Not nice.

My latest gripe with Amarok? I run Ubuntu 9.10 at work (Amarok 2.2.0), and latest Arch at home. In the latter, I just updated Amarok 2.2.1 to 2.2.2 in the weekend (Arch is much more up to date than Ubuntu, since it’s based in almost bleeding-edge rolling releases). Well, unlike Amarok 2.2.1 before (or Amarok 2.2.0 at work), the new Amarok 2.2.2 does not have an option for random play. Yes, you read correctly. There is no way I know of to avoid playing all the songs in the playlist in the exact order (in principle, alphabetical) they are laid on. In older versions, you could play songs or albums randomly. With 2.2.2, they lost this capability. Amazing feature regression, if you ask me.

Comments (3)

Reverse SSH to twart over-zealous firewalls

I guess it is not very uncommon, since it has happened twice to me, in two sites I have worked. “Over-cautious” sysadmins decide that the University, Institute, Corporation, or whatever, would be safer if connections to the [[LAN]] from outside of it were banned, including the [[Secure Shell|port 22]]. In an effort to avoid making security trample service (how considerate!) the usual solution to allow remote conection is to use [[VPN]].

While VPN might have some advantages over SSH, I prefer the latter by far, and don’t think a proper SSH setup has any lack of security, specially comparing to poorly implemented VPNs. For example, I would never trust something as vital as VPN software to a private company, yet most popular VPNs are proprietary (at least the University of the Basque Country uses the Cisco VPN). It is at least paradoxical that a free and open SSH implementation as e.g. [[OpenSSH]], tested in such a throughout way, and for so long, is dumped, and a black-box solution developed by a profit-driven organization is used instead.

But I digress. I am not interesting in justifying why I want SSH. What I want to show here is a trick I learned reading tuxradar.com. Esentially, allows one to connect (with SSH) from machine A to machine B, even if machine B has all ports closed (so SSH-ing using another port would be useless either).

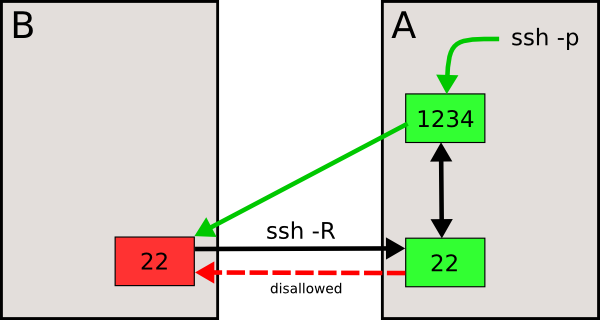
The idea (see below) is to connect from machine B to A, which is allowed (and is also the exact reverse of what we actually want to do), in a way that opens a canal for a “reverse” connection from A to B:

(In machine_B)
% ssh -R 1234:localhost:22 username_in_A@machine_A

Then we will be able to use port 1234 (or whatever port we specify in the ssh -R command above) in machine A to connect to machine B, as long as the original ssh -R holds:

(In machine_A)
% ssh username_in_B@localhost -p 1234

The picture shows it better:

SSHing from A to B (dashed red arrow) is disallowed, but the reverse (in black) is not. The ssh -R command line (see code above), opens up the link between ports 22 and 1234 (two-headed black arrow), so that a ssh -p to port 1234 in machine A will redirect us to machine B. If we are asked for a password (at the ssh -p stage), they are requesting the one for machine B, since we are being redirected to machine B.

Please, recall that the above recipe is no less secure than a regular SSH from A to B (if it were allowed), since anyone SSHing to port 1234 in machine A will be automatically redirected to machine B, but undergoing the same security checks as usual (password, public/private key…). Note also that I am talking about what is possible, not necessarily desirable or comfortable. It’s just another tool if you want to use it.

Comments

« Previous entries Next Page » Next Page »