Ubuntu 8.10 Intrepid Ibex is here!
As you can see on the right side tab of this page, Ubuntu 8.10 has just been released!

Pick a mirror and download. Or better yet, do it through BitTorrent.
As you can see on the right side tab of this page, Ubuntu 8.10 has just been released!
Pick a mirror and download. Or better yet, do it through BitTorrent.
Hey, October almost passed and I didn’t write the montly report on LWD. I might make it bimontly, to produce less spam in the blog. You can read an intro for my Linux World Domination project in this May 2008 post.
As usual D2D means “days to domination” (the expected time for Windows/Linux shares to cross, counting from Feb 3, 2008), and DD2D means difference (increase/decrease) in D2D, with respect to last report. CLP means “current Linux Percent”, as given by last logged data. The new datum DD means domination day (in YYYY-MM-DD format).
As a new feature, I am now fitting the curves (to predict Windows/Linux crossing) to first degree polynomials, but taking only the last N points so that the [[Coefficient_of_determination#Definitions|coefficient of regression]] is close to 1 (yes, I am being purposely unclear and arbitrary on this subject).
| Project | D2D | DD2D | DD | CLP | Confidence % |
| Einstein | 882.1 | +571.9 | 2011-03-31 | 35.17 (+0.27) | 37.3 |
| MalariaControl | 6890.0 | +6268.8 | 2027-09-10 | 12.26 (+0.06%) | 0.3 |
| POEM | 3613.9 | – | 2018-09-21 | 9.81 (+0.05%) | 0.4 |
| QMC | >10k | – | – | 7.88 (+0.0%) | – |
| Rosetta | >10k | – | – | 7.91 (+0.11%) | – |
| SETI | >10k | – | – | 7.86 (+0.03) | – |
| Spinhenge | >10k | – | – | 3.21 (+0.2%) | – |
OK, the data seems discouraging. The crossing day (DD) seems to be further away every month, instead of closer. Recall however that the only (half) reliable data are the current (and past) percents. All the rest is speculation, and the fits change wildly depending on the function used to make them, and the number of points fit.
Starting with this month’s issue, I might post pictures of the evolution plots. Today I’m showing the plots for Einstein@home. Next month: Malaria@home.
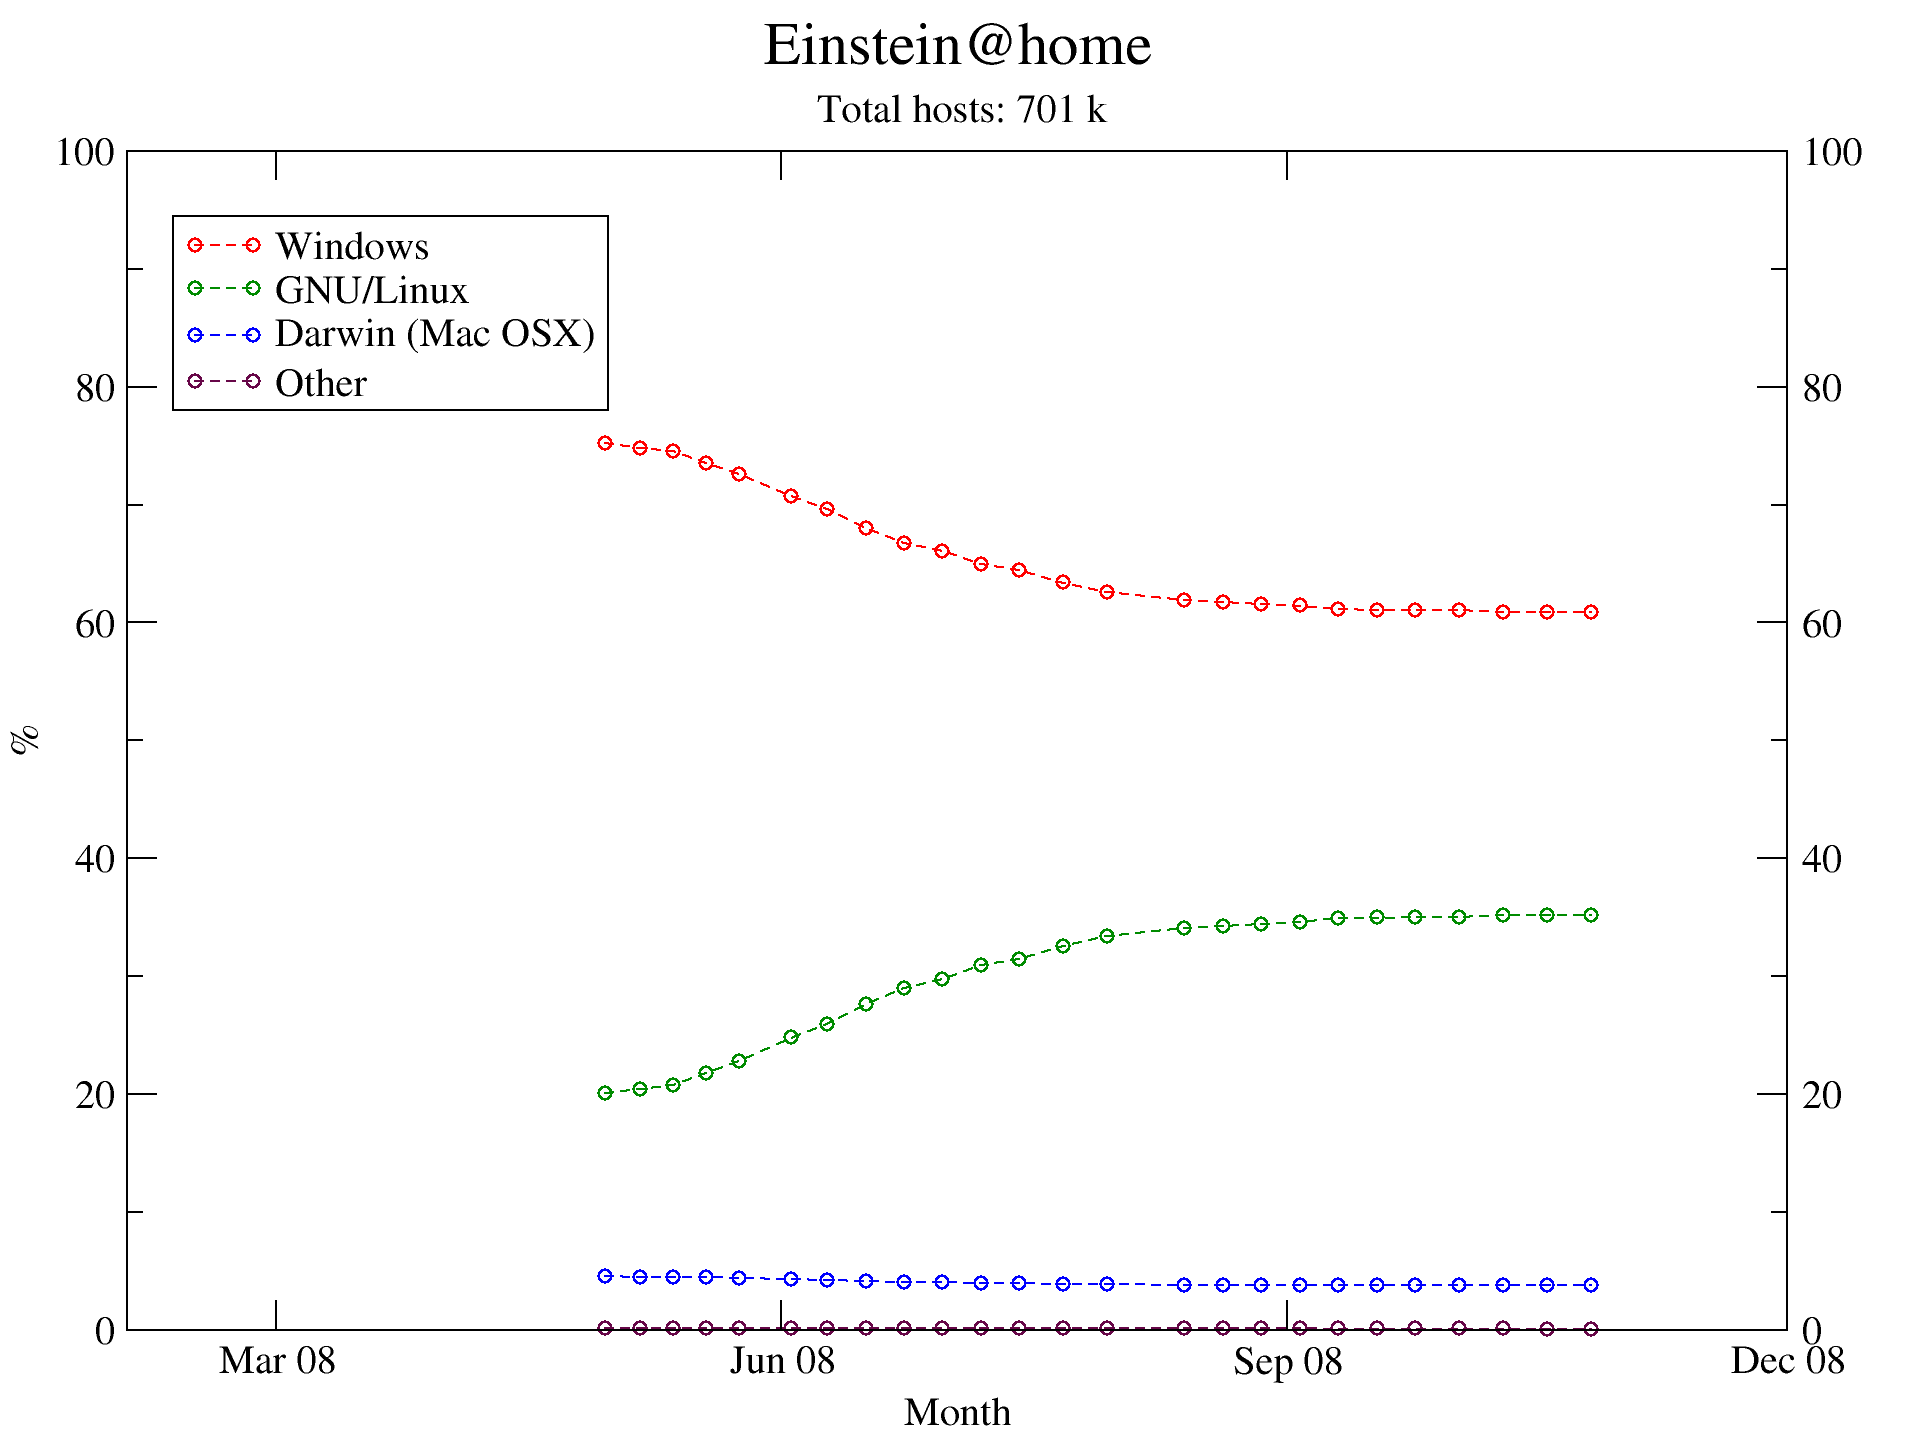
Number of hosts percent evolution for Einstein@home (click to enlarge)
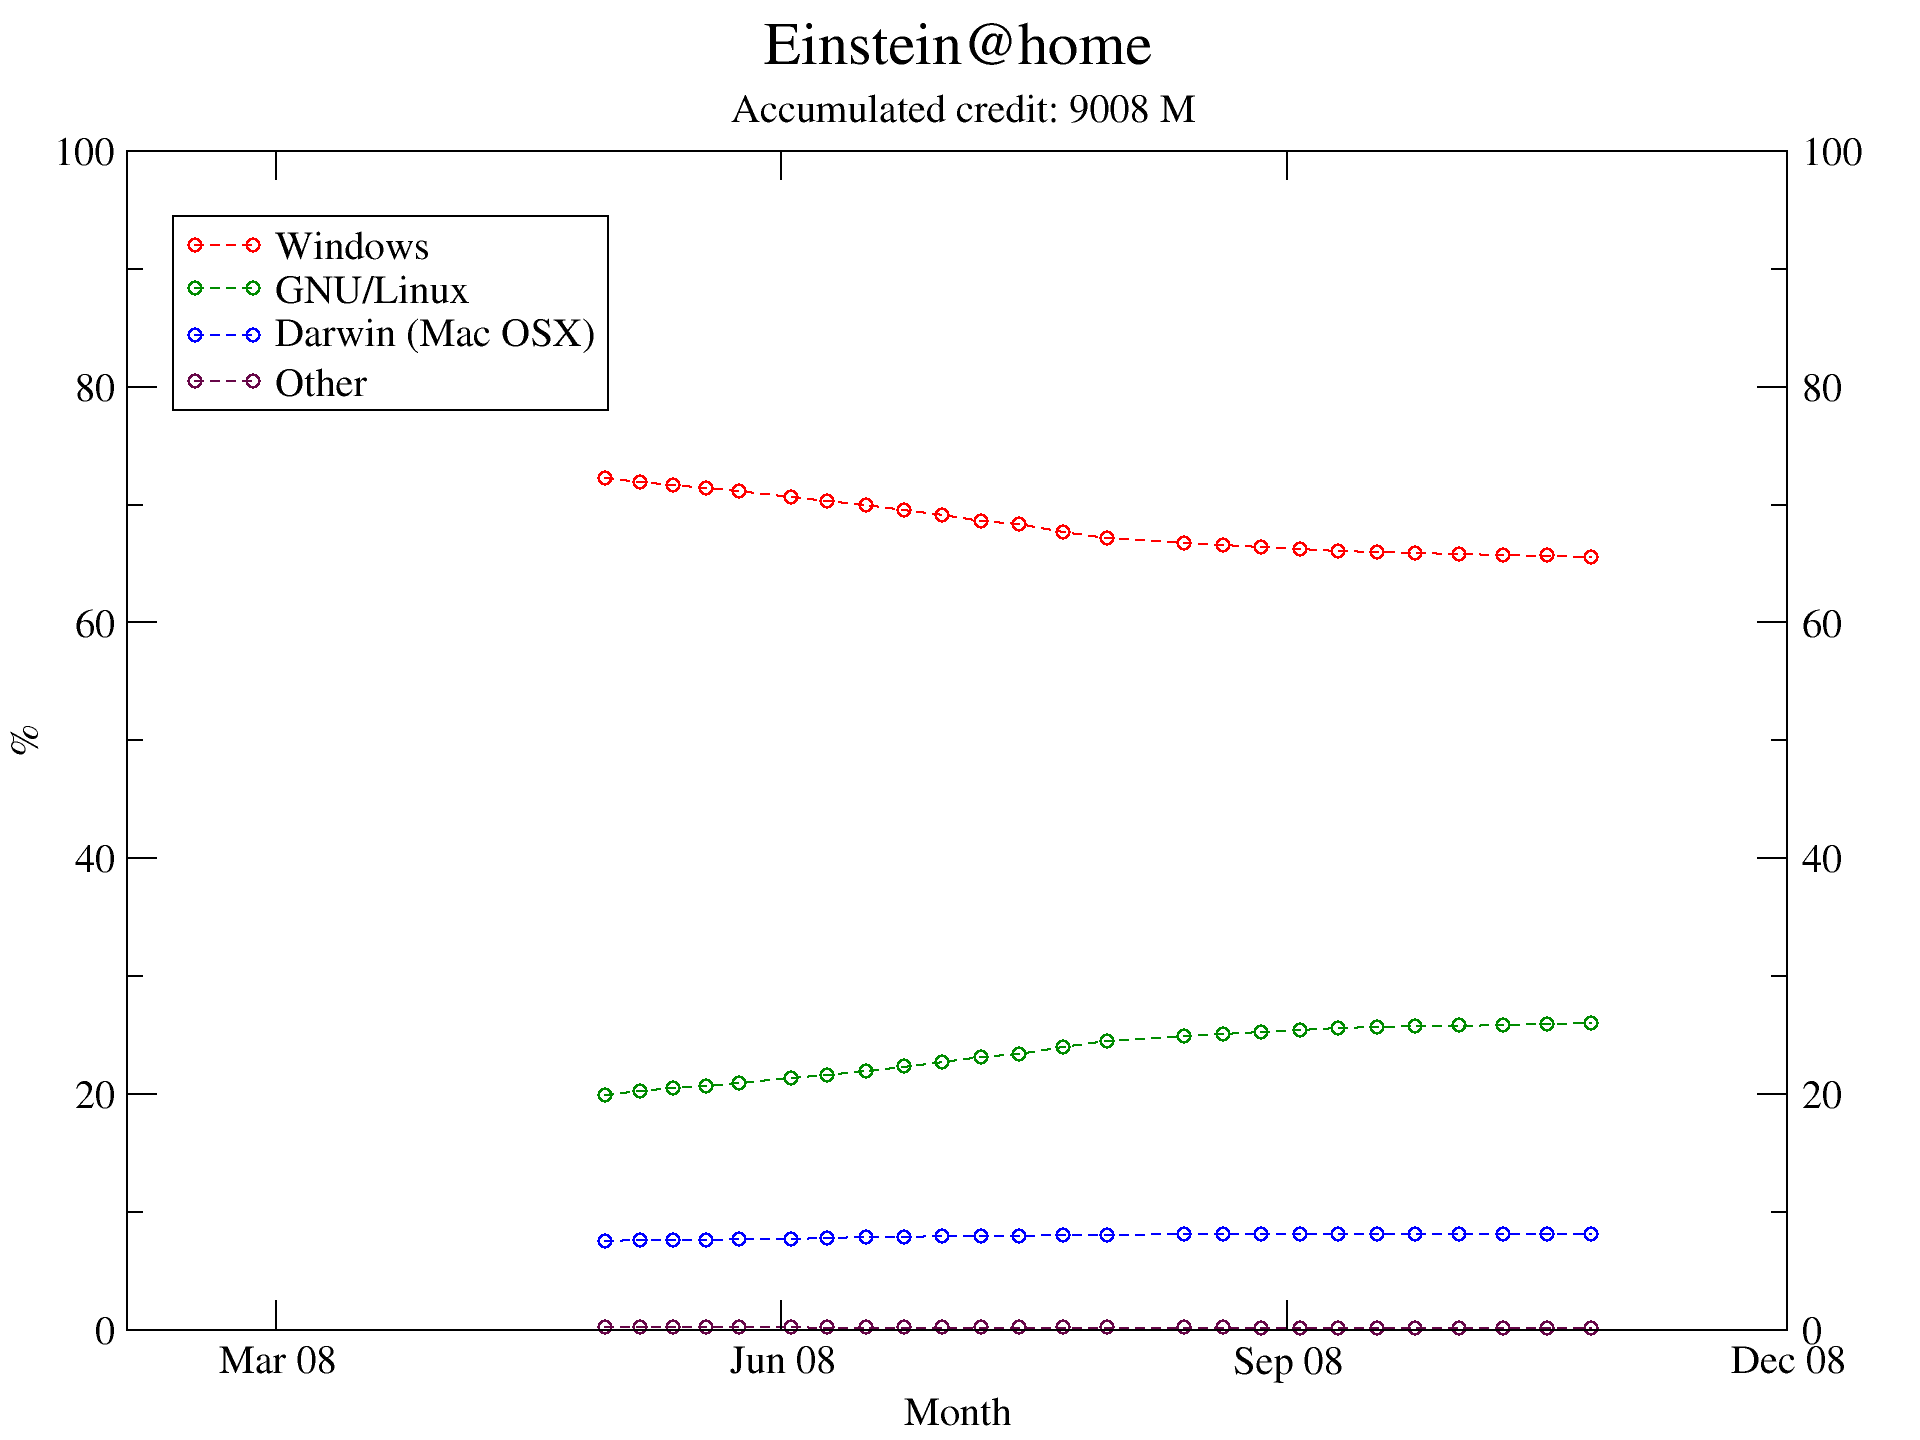
Accumulated credit percent evolution for Einstein@home (click to enlarge)
LeÃdo vÃa Menéame, un vÃdeo hecho por alumnos de una escuela de Ordizia, mi pueblo natal:
Ya comenté en un post anterior los pros y contras que encontraba para contratar Orange o simyo como proveedor de internet móvil. Finalmente escogà simyo, con quien no tengo en principio queja, excepto que en general es más lento e irregular de lo que esperaba (pero temo que sea un problema inherente al uso de red de telefonÃa móvil).
Con el tiempo he ido viendo cada vez más anuncios de internet móvil, por la calle y en televisión. Obviamente los que más machacan con el tema son los ladrones de Movistar, como con todo con lo que creen que pueden sacar tajada engañando proveyendo de un servicio a la gente.
Lo que me indigna es lo absolutamente vergonzosas que son las ofertas de los principales operadores (Movistar, Vodafone y Orange), respecto a otras como la de simyo. Por ello, voy a hacer una mÃnima comparativa, y que el lector saque conclusiones.
Bases
Se ha comparado un producto de cada empresa, teniendo como caracterÃsticas una tarifa plana hasta cierto volúmen de datos mensual. Tras ese gasto la velocidad ofrecida baja en todos los casos, pero no se cobra más por ese volúmen extra. Los precios son con IVA.
Datos
| CompañÃa | Ancho de banda | Precio | LÃmite datos | Velocidad tras lÃmite | Permanencia |
| simyo | 3.2 Mbps | 28.99 € | 5 GB | 128 kbps | 0 |
| Movistar | 3 Mbps | 45.24 € | 1 GB | 128 kbps | 18 meses |
| Vodafone | 3 Mbps | 45.24 € | 1 GB | 128 kbps | ns/nc |
| Orange | 3.6 Mbps | 45.24 € | 5 GB | 128 kbps | 18 meses |
Notas adicionales
Conclusiones
¿Hace falta añadir algo?
The music loving community may rejoice, ogg2mp3 is out! OK, OK, that is too much to say, but nonetheless someone could find it useful.
Visit its site at: http://isilanes.org/soft/ogg2mp3
ogg2mp3 is a simple Python script I have made to make the task of converting OGG files to MP3 and the other way around easier. There might be other (better) tools out there for the same task, but I had some need, and this script fulfills it. ogg2mp3 can convert single files, lists of them, or even whole directory contents, and reads the [[ID3]] tags of the input OGG/MP3 files, saving them into the output MP3/OGG.
I basically convert bunches of OGG files to MP3 when I want to put them in portable players that don’t read OGG. I do the opposite when someone passes me an MP3 and I want to add it to my collection, which is in OGG format.
Enjoy!
Last friday I wrote about how to install a Huawei E220 modem under MacOSX. Today I will write the corresponding HowTo for Linux.
Usually installation of hardware with non-free drivers is a bit more difficult in Linux than in MacOS and Windows, because the drivers are only made for the latter two. However the E220 is well supported by the Linux kernel (starting at 2.6.20, apparently), so we only need to tweak some configuration files.
1 – Make the system see it properly
The Huawei E220 is a dual machine: apart from being a modem, it is also an USB flash device, with some space to save the Mac/Windows drivers, so that it will “autoinstall” when plugging it under those OSs.
This adds a small level of difficulty, because we have to make sure that the OS sees it as a modem, not as a storage device. In principle the command dmesg (or the file /var/log/messages) will tell us about it. However, I have had it work when dmesg would say that it was a storage device!
The short story is that some [[Kernel (computer science)|kernel modules]] must be loaded, and some others unloaded, when you plug the device. Needed modules: option, usbserial, ppp_async. Must not be present: airprime. In my case usb_storage made no harm, some people say you should unload it. For airprime not to be automatically loaded, put it in some [[Modprobe#Blacklist|blacklist]] file in /etc/modprobe.d/. I decided to add the following line to /etc/modprobe.d/blacklist-modem:
You can ensure the required modules are loaded by taking advantage of [[udev]], but it is not really necessary (in my case it wasn’t). udev can also give you a consistent name for the modem. For me the relevant device was always /dev/ttyUSB0, but you can make it /dev/huawei if you will. For that, you can put the following optional rules in a file in /etc/udev/rules.d/ (for example create 55-huawei.rules):
Two notes: the strings in idProduct and idVendor are obtained running the command lsusb when the modem is plugged. It will show something like:
This is a very neat trick for any USB device we want to manage with udev. The second note is that [[kppp]] (see later) only allows to choose a modem device from a list. If you make the modem be /dev/huawei, you will not be able to use kppp, since that device won’t appear in the list.
2 – Configure wvdial / kppp
You can make use of programs such as [[wvdial]] or [[kppp]] to make the actual connection. I use kppp myself, but that’s up to you (wvdial is apparently more flexible).
wvdial
To use it you have to create a /etc/wvdial.conf file. You can achieve this by running wvdialconf as root, or editing the file by hand, if you are brave.
For me, the output of wvdialconf yielded:
Scanning your serial ports for a modem.
Modem Port Scan<*1>: S0 S1 S2 S3
WvModem<*1>: Cannot get information for serial port.
ttyUSB0<*1>: ATQ0 V1 E1 — OK
ttyUSB0<*1>: ATQ0 V1 E1 Z — OK
ttyUSB0<*1>: ATQ0 V1 E1 S0=0 — OK
ttyUSB0<*1>: ATQ0 V1 E1 S0=0 &C1 — OK
ttyUSB0<*1>: ATQ0 V1 E1 S0=0 &C1 &D2 — OK
ttyUSB0<*1>: ATQ0 V1 E1 S0=0 &C1 &D2 +FCLASS=0 — OK
ttyUSB0<*1>: Modem Identifier: ATI — Manufacturer: huawei
ttyUSB0<*1>: Speed 9600: AT — OK
ttyUSB0<*1>: Max speed is 9600; that should be safe.
ttyUSB0<*1>: ATQ0 V1 E1 S0=0 &C1 &D2 +FCLASS=0 — OK
WvModem<*1>: Cannot get information for serial port.
ttyUSB1<*1>: ATQ0 V1 E1 — OK
ttyUSB1<*1>: ATQ0 V1 E1 Z — OK
ttyUSB1<*1>: ATQ0 V1 E1 S0=0 — OK
ttyUSB1<*1>: ATQ0 V1 E1 S0=0 &C1 — OK
ttyUSB1<*1>: ATQ0 V1 E1 S0=0 &C1 &D2 — OK
ttyUSB1<*1>: ATQ0 V1 E1 S0=0 &C1 &D2 +FCLASS=0 — OK
ttyUSB1<*1>: Modem Identifier: ATI — Manufacturer: huawei
ttyUSB1<*1>: Speed 9600: AT — OK
ttyUSB1<*1>: Max speed is 9600; that should be safe.
ttyUSB1<*1>: ATQ0 V1 E1 S0=0 &C1 &D2 +FCLASS=0 — OK
Found a modem on /dev/ttyUSB0.
Modem configuration written to /etc/wvdial.conf.
ttyUSB0
ttyUSB1
And my current /etc/wvdial.conf looks as follows:
[Dialer simyo]
Dial Command = ATDT
Phone = *99#
Init2 = ATZ
Init4 = ATE0V1&D2&C1S0=0+IFC=2,2
Init3 = AT+CGDCONT=1,”IP”,”gprs-service.com“;
Stupid Mode = 1
Modem Type = Analog Modem
ISDN = 0
Modem = /dev/ttyUSB0
Username = whatever
Password = whatever
Baud = whatever
In bold, the relevant user-provided settings. In italics, some items in which you can put whatever, because it doesn’t seem to make a difference.
To connect, run wvdial simyo (or whatever you put in the “[Dialer xxx]” setting above), in the command line. To terminate, Ctrl+C.
kppp
This is the one I use. To open the config/run dialog, run kppp (you can do this as user). There you will have to configure two things: the account and the modem. By pressing “Configure” you will be presented with a window with four tabs. In the first one you will create a new account, in which the relevant data is:
In the second tab you will configure the modem:
Please note that those are parameters that work for me. I can not assure that they are the “correct” ones. I have player around with different values, and many times the modem would work all the same with different settings. If you find some error in my setup, please tell me :^)
It is common to hear that recent advances in the Linux desktop, such as [[Compiz Fusion]], are more of a fancy but useless aesthetic contribution to the desktop. While it may be true for many of the CF features, it is no less true that you never know when a given effect will turn out to be useful.
In this post I want to praise the Enhanced Zoom Desktop plugin. It turned out to be of great use for me in the following situation. I wanted to run [[Diablo II]] in my laptop (yes, it runs in Linux, under Wine). The native resolution of the program (640×480 or 800×600) is lower than that of my screen (1280×800), so I have two options: to execute it in windowed mode, or fullscreen. In windowed mode the window occupies less than 2/3 of the 13.3″ screen, wasting space and making it unnecessarily small. Fullscreen mode seems to be better, but it isn’t. Since the width/height ratio is smaller for Diablo than for the screen, the former will be stretched horizontally, distorting the images (everything looks more squat). Fullscreen mode also gave me other problems, like crashing more easily when alt-tabbing.
Here is where the zooming of Compiz Fusion comes in handy. Apart from an arbitrary zoom (using the mouse wheel while pressing the Super key, a.k.a. windows key), there is a handy shortcut (Super+r) that zooms up to the point of the screen under the cursor occupying the whole screen. When zooming, the movement of the mouse makes the zooming “window” to move around, showing different parts of the desktop. To avoid it (clearly unwanted if we want to stay inside the Diablo window), we have another shortcut: Super+l. This shortcut toggles on and off the “zooming lens follows the mouse” movement.
So now, if I want to play Diablo I open it in windowed mode, then put the cursor inside the window, then hit Super+r, then Super+l, and I have a Diablo window as big as possible to fit in my screen, preserving height/width ratio, and keeping the mouse inside the window.
I am a heavy user of the [[Grace (plotting tool)|Xmgrace]] plotting program, and I love it. An operation very ofter used is to scale the X and Y axes to our liking, to show different parts of our data in the resulting plot. You can do that from the command line by setting the “world” of the graph, providing four numbers as X,Y boundaries:
% xmgrace -world xmin ymin xmax ymax file.dat
Apart from setting the maximum and minimum values for X and Y, we can make use of the autoscale option to selectively show some ranges. The four options to autoscale are:
But Xmgrace is not only about [[command-line interface|command line]], or even [[Graphical user interface|GUI]]. You can write a .agr file (for example by saving a plot from the Xmgrace GUI), and manipulate it so that the following command:
% xmgrace file.agr
will bring up a plot with all the data and formatting we have put into the .agr file. It’s really handy to save a file as-is.
Now, the syntax for inputting the world in the .agr is well known:
@ world xmin, ymin, xmax, ymax
where xmin etc. are floating point numbers.
The problem is how to hardcode the autoscale feature into the .agr. I had always been forced to do:
% xmgrace -autoscale none file.agr
from the command line, because I couldn’t find out how to include it in the .agr. Finally I did find it, and that’s the main reason of this post. The syntax is explained in the manual at the Xmrace site, but I found it after googling for agr files containing “autoscale” in them. The line to include seems to be:
@ autoscale onread none
A .agr containing the above line will produce, when called as follows:
% xmgrace file.agr
the same output as a file not containing it, when called as follows:
% xmgrace -autoscale none file.agr
